

SuperSync was designed for iTunes users. To get the most benefit from SuperSync, you want to make sure your SuperSync and iTunes are working well together. If you are having problems with iTunes, check the following:
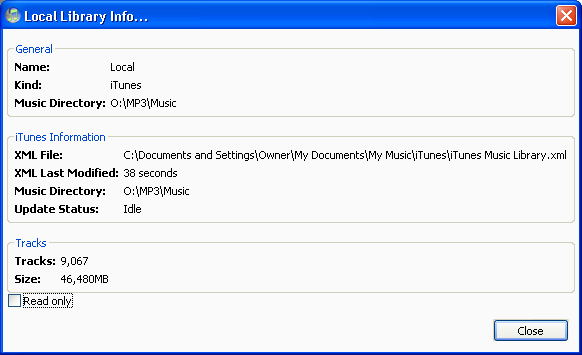
iTunes users will want to make sure their Local Library is set to an iTunes share. To check this, under the File menu, select Local Library Info...

Kind: The Local Library type should be set to Kind: iTunes. If the kind is set to Disk, you'll need to set your local library to an iTunes share, which you can do after you have iTunes installed and running. Do from the File->Configure Local Library... Check that the library type changed iTunes.
The iTunes information shows which iTunes Music Library.xml file is being used by SuperSync to read your iTunes library. iTunes creates this file when iTunes starts up, and any time you update your library (by adding a track, playing a track, changing a rating, or many other operations.)
Safe to delete: The iTunes XML file can safely be deleted -- it is only written to disk and is never modified by SuperSync or read in by iTunes.
XML Last Modified: Check that the iTunes file was modified recently. In the case above, we haven't used iTunes in almost two days. This is correct for us. However, if your last modified date is very old and you've used iTunes recently, you probably have SuperSync pointing to an out of date iTunes XML file.
If SuperSync is pointing to an out of date iTunes library, you'll need to find the most recent version on your computer for your user account. Use your computers file search to find all files that match Music Library.xml. When you find one, it should have a modification date later than when you last started iTunes. Use the Configure Local Library to point SuperSync to the new XML location.
Read Only: This should be unchecked if you intend to have SuperSync add music to your iTunes library.
At this point, your SuperSync music library should show the contents of your current iTunes library.
Note: Some types of files are not currently written to the iTunes XML Library (ringtones, for one.) So library counts may be a little off, but still ok.
From the Tools menu, select Check iTunes Connection...
This will attempt to start iTunes if it isn't running. Any open dialogs in iTunes will prevent Supersync from communicating with iTunes.
If you get a success message, you can skip to step #3.
OS-X Users: SuperSync for OS X uses AppleScript to communicate with iTunes. Check the SuperSync AppleScripting troubleshooting guide if you are getting AppleScript errors.
Windows Users: SuperSync uses the COM interface to talk with iTunes. If you get an error communicating with iTunes on a windows machine, we don't have as much useful information to help you. Make sure any dialogs in iTunes are closed. Restarting iTunes, SuperSync, or your computer may help. Reinstalling iTunes may help.
The whole point of SuperSync is to let you move files from one library into your iTunes library automatically. If this part isn't happening, you'll want to know why!
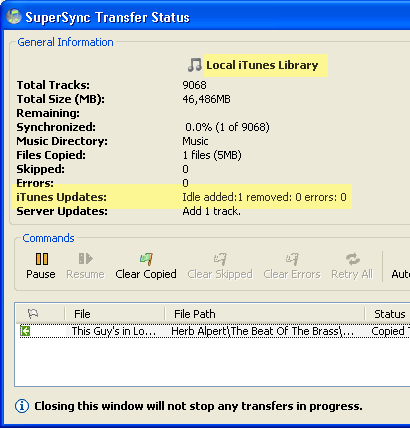
To add a track from a remote library into your local iTunes library, you should have checked steps #1 and #2. Open a remote library, then select a "Blue" track you want to copy and click Synchronize. Check the Transfer Status Window by selecting it from the Controls menu (cmd-T).
If the track is copied successfully, it will then be added to iTunes. The status of iTunes communication is shown on a single line in the transfer status window. (Also, under the iTunes status pane, from the Status -> iTunes menu.)

If the file does not transfer to iTunes, an error will be generated. If the file is successfully added to iTunes, you'll see the "added" statistic increase. If you copy a lot of tracks using SuperSync, these files will be added one at a time and the status of the iTunes copy queue will show.
Note: The iTunes queue may be paused from the File menu.
If you are seeing errors when adding files to iTunes, the best thing to do is try to get an error message to the SuperSync log window. From File menu, select Show Log Window (cmd-D). Some file types may not be supported by iTunes, or your iTunes library may be reporting another type of error. If you want, you can send us an error log and we'll try to help figure out what went wrong.
Playlists should be visable in the Playlist Tree. If you do not see your playlists, go to the menu: Controls -> View Playlists and make sure that menu item is checked.
Local playlists will be gray, remote playlists will be blue, and synchronzied playlists are green.
Select a playlist and the tracks that are in your playlist will show up. (Currently, if the same song is in the playlist more than once, it will only be displayed the first time--but you can still copy a playlist completely including duplicates, if you want.)
To synchronize a playlist, you'll need to be connected to another networked SuperSync that is also configured as an iTunes SuperSync library.
Right click on a Gray playlist and first synchronize all the tracks. When all the tracks are synchronized or cannot be synchronized any more (due to errors, duplicates, or other issues...) you'll be able to synchronize the playlist.
Playlists are currently synchronized one at a time. (We're working on a batch synchronize mode)
Smart Playlists cannot be synchronized at this time, due to a limitation of Apple's current programmers interface. If you export/import your smart playlists, there is a way, but its a bit complicated... it involves making a copy of your iTunes Music Library.xml file, opening the copy in a text or xml editing application, then removing all the tracks and "dumb" playlists.. Leaving only the smart playlists you're interested in copying to another machine. Then save the XML file as "smart_playlists.xml", and send it to the new machine where you want to import the smart playlist. Next, back up the iTunes library files, then import the smart_playlists.xml file into the iTunes library using the File: Library: Import feature in iTunes. Do this at your own risk..
If you're still having problems, let us know.. Usually SuperSync can talk to iTunes without a problem. But if there are errors, we'd like to know so we can help improve everyone's experience.