Removing Duplicates
Removing duplicates is one of the most common frustrations of managing a large collection of music.
SuperSync offers several tools to compare tracks and remove duplicates.
Removing Tracks by adding them to the SuperSync trash and/or deleting them from iTunes involves the risk of losing a track you wanted to keep. Always back up your library and proceed with caution when adding tracks to the trash or removing them from iTunes.
The SuperSync tools for duplicate removal are: Duplicate Flags filters, Track Comparison Dialog, and "Remove Duplicates..."
Duplicate Flags Filters
On the left hand tree, you should see a group of filters called "Duplicates". If you don't see them, enable the "Show Filters" from the Status Menu.
Select a filter to view the tracks that match. The two numbers in parenthesis show the counts for the local, remote libraries.
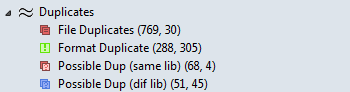
 File Duplicates Displays tracks that
are duplicates based on file size, CRC, format, etc. File Duplicates Displays tracks that
are duplicates based on file size, CRC, format, etc.
 There may be some file duplicates that you do not want to remove, for instance, iTunes Match will often return the exact same song when the song is on two albums (e.g. a Greatest Hits album and the original). Here your library will contain two bit-for-bit copies of the music, but the tags will have two different albums listed. In that case, deleting the duplicate is not recommended, so that you can keep your albums complete. There may be some file duplicates that you do not want to remove, for instance, iTunes Match will often return the exact same song when the song is on two albums (e.g. a Greatest Hits album and the original). Here your library will contain two bit-for-bit copies of the music, but the tags will have two different albums listed. In that case, deleting the duplicate is not recommended, so that you can keep your albums complete.
 Format Duplicates are tracks appear to be in both AAC and MP3 format. Some people want to have both an MP3 and AAC format, but some people only want one or the other, or the highest bitrate version available. Format Duplicates are tracks appear to be in both AAC and MP3 format. Some people want to have both an MP3 and AAC format, but some people only want one or the other, or the highest bitrate version available.
SuperSync always will prefer to keep the highest bitrate songs.
If you prefer AAC or MP3, SuperSync may recommend deleting in your preferred format. Always check the results and proceed with caution.
 Possible Dup (same lib) are tracks
that are possible duplicates in the same library where artist, album and title match. Possible Dup (same lib) are tracks
that are possible duplicates in the same library where artist, album and title match.
Possible duplicates have similar tags, are within 1.5 seconds in length, and might be duplicated in your library.
These duplicates require the most care to make sure you don't erase something by mistake! Due to the large number of similar sounding artists, albums, and tracks, SuperSync can mis-identify possible duplicates.
Select just a few tracks at a time and watch out for mismatched tracks by looking at the track to keep followed by the tracks to delete (marked by the trash icon.)
 Possible Dup (dif lib) are tracks
that are possible duplicates across two libraries. The Remove Duplicates feature only works on tracks that are in the same library. Possible Dup (dif lib) are tracks
that are possible duplicates across two libraries. The Remove Duplicates feature only works on tracks that are in the same library.
More Duplicates may be in your library that SuperSync does not detect. This is usually because the tags (title, album, artist, etc) are different in the two tracks. You will need to identify these on your own, usually by sorting by Album and Artist and scanning visually for duplicates.
Comparing Tracks
Use the Track Comparison tool to look at possible duplicates. This window can be accessed by the Action menu, or by using  = (equals). Select any track, and if it has duplicates, those will be available to compare in the comparison window. You can use this tool to put one or the other track into the trash for removal. = (equals). Select any track, and if it has duplicates, those will be available to compare in the comparison window. You can use this tool to put one or the other track into the trash for removal.
Removing Duplicates
SuperSync has a featured called Remove Duplicates... available from the Action menu. SuperSync will go through the selected tracks and try to find duplicates that you may want to delete. These tracks are put in the trash, and you are given the opportunity to view the changes and either keep them in the trash or remove them from the trash. Later you will you have the option to Empty the Trash from the Action menu.
First, if you're using Apple's Match/iCloud service, please make sure you've read about using SuperSync with iCloud. This will explain the extra steps required to "empty the trash" and help keep your Cloud Tracks in order.
We recommend you fix duplicates in your local library first. Select Close Remote Library from the Remote menu if one is open. Removing duplicates can be done on some remote libraries, but its usually easier and better to do it on the local machine.
Start with File Duplicates, by selecting the filter. The first number in parenthesis will be the number of file duplicates SuperSync detected. Continue with the steps below. Once you understand the process, you can carefully proceed to Format Duplicates, and finally "Possible Duplicates".
1. Select the Format Filter you wish to display. (Start with File Duplicates).
The tracks will be displayed in "standard order" and you can view them by album, artist, title, file path, etc. to help you visualize the duplicates.
2. Select one or more tracks that you wish to remove duplicates on and select Remove Duplicates... from the Action menu.
|
Until you get used to SuperSync's duplicate removal system, you should just select a few tracks at a time to fix. We don't want you to remove the wrong tracks by mistake! Always carefully review the suggestions before continuing. |
3. The tracks will be displayed with suggested duplicates to remove marked with a trash can icon, and tracks to keep will not be marked with for trash.
A Dialog will appear saying what SuperSync did and whether you want to keep the tracks in the trash. Read the notice carefully. You may need to move this dialog around to see the changes. If you want to proceed, click "Keep in Trash", if you want to undo the changes, click the "Undo Changes" button.
4. If you clicked "Keep in Trash" your tracks will be displayed in Duplicate Removal Order, where the track to keep will be first, followed by one or more duplicates recommended for removal.
Carefully review the changes. You can remove all items from the trash by selecting "Remove All from Trash" from the Action menu. You can remove a selection of tracks from the trash by selecting them and choosing "Remove from Trash" from the Action menu.
With tracks in the trash, you can either delete the trash now or add more duplicates to the trash by repeating steps 2-4.
When you are ready, select Empty the Trash from the Action Menu.
Note, if you are using the iCloud/iTunes Match, you may need to manually delete them from iTunes by following the instructions in the SuperSync trash dialog. Typically you'll want to click the iTunes box that says "Also delete tracks from the cloud". This is covered in the cloud help topic.
SuperSync -- iTunes libraries in perfect harmony. Copyright © SuperSync.
SuperSync is licensed for reproduction of non-copyrighted materials or materials the user is legally permitted to reproduce.
iPod and iTunes are registered trademarks of Apple, Inc., which is unaffiliated with SuperSync. Please do not steal music.
|