SuperSync is software for Mac and Windows that lets you compare and merge all of your music libraries on multiple computers and devices. If you have music and video libraries at home, the office, on laptops, on iPods, iPhones, and disk drives, SuperSync can help you move and sync your iTunes content from one library to another, easily and intuitively.
SuperSync can read a single library or two libraries at the same time. In SuperSync, we refer to these libraries as the Local and Remote Libraries. Once SuperSync reads your library/libraries, you can use the SuperSync's Get, Put, and Sync actions to move music between your two libraries.
The Local Library is a music library on the machine that SuperSync is running on. By default, the Local Library is set to read the iTunes Library on that machine. For example, if you run SuperSync on your laptop, SuperSync will connect to that laptop's iTunes Library.
Note: The Local Library can also be set to other types libraries. This is an advanced topic that is discussed in detail in the "Configuring the SuperSync Local Library" section in this manual.
The Remote library is the one you are comparing your Local Library. In most cases, the Remote Library will be the music library from another computer running SuperSync. For example, if you have a laptop and a desktop both running SuperSync, the desktop will be the Remote Library for the laptop.
Note: The Remote Library can also be set to other types libraries such as an iPod, another hard drive, or another networked computer running SuperSync. This is an advanced topic that is discussed in detail in the "Configuring the SuperSync Remote Library" section in this manual.
Tech Info: SuperSync is a client/server application. The SuperSync server is turned on/enabled by default so that SuperSync computers can connect to each other. You can enable/disable the SuperSync Server feature in SuperSync's Preferences window. To access a SuperSync computer from outside your firewall, you'll need to know a little more about IP addresses and port numbers, which is described in more detail in the SuperSync Server and WAN Access sections later in this manual.
The Local and Remote Libraries are two distinct libraries that may contain some, or all, or no tracks in common. That's where SuperSync comes in. SuperSync connects the two libraries and and lets you compare and sync tracks between the two libraries.
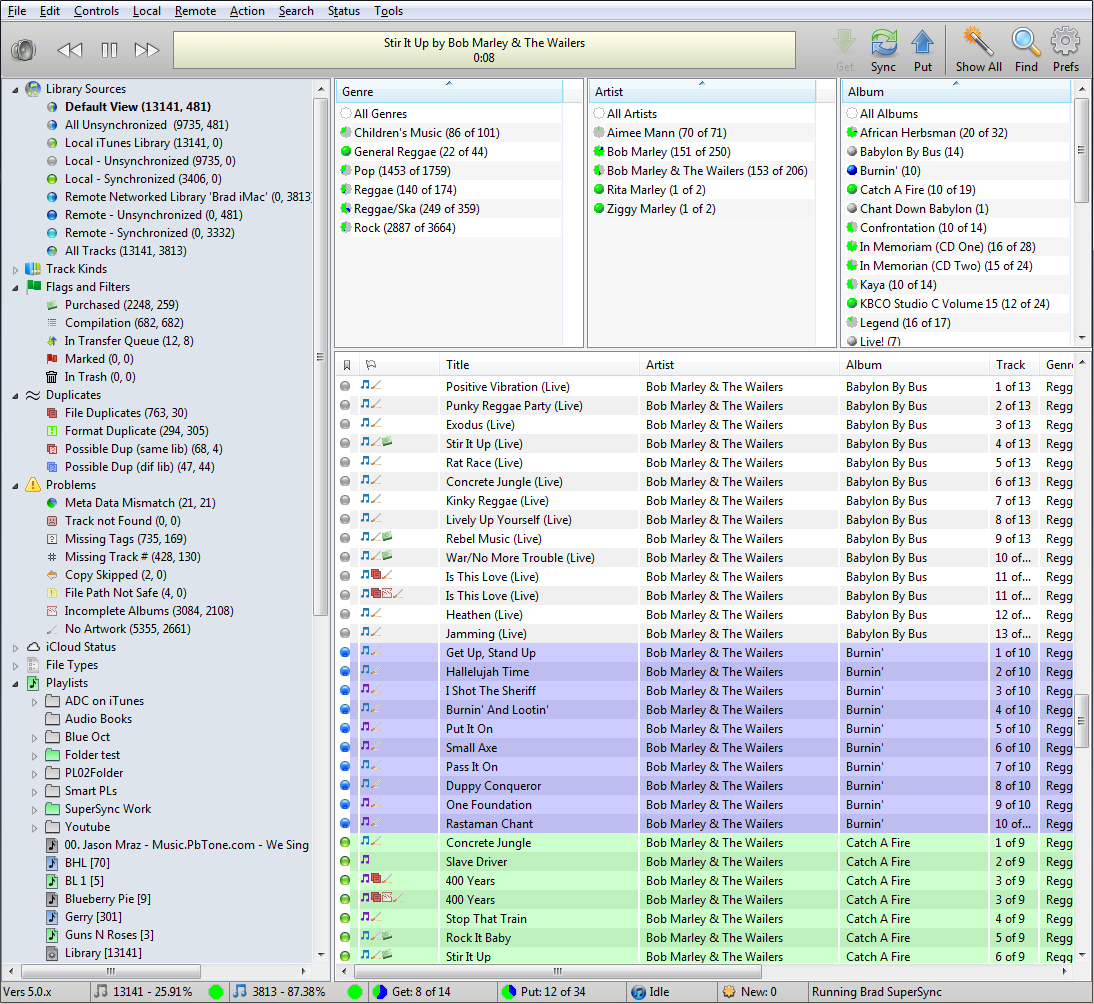
SuperSync displays your music library/libraries in the SuperSync Window (see image below):
The SuperSync window is where you can play, compare, search, and sync tracks from different libraries. It also gives provides the status of various SuperSync features and actions such as transfer status, SuperSync Server status, iTunes actions, etc.
Note: More information about this window and it's features/actions can be found in the "SuperSync Window" section in this manual.
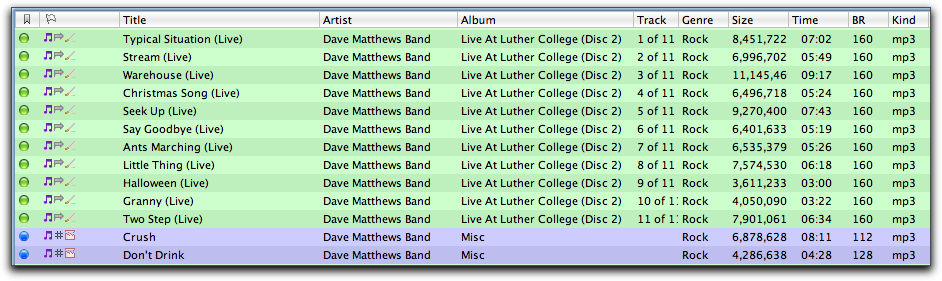
When viewing tracks, you will notice a a colored dot next to them. This dot identifies where the track exists and whether or not it has been synchronized in both libraries. The following is a list of the possible colors you may see:
Files can be transferred between the Local and Remote libraries using the following SuperSync actions:
Note: You can use Get, Put, and Sync on a single track, tracks from an artist, genre, etc., and tracks of a particular type (e.g. MP3, M4A, etc.) or on an entire library.
SuperSync groups your libraries' content in standard groups/views such as Music, Movies, TV Shows, etc. In addition to these, SuperSync also groups songs by other criteria such as File Duplicates (tracks that are identical), Possible Duplicates (tracks that are very similar based but don't aren't an exact duplicate), tracks without artwork, tracks with missing track numbers, etc.
In the SuperSync Window, you can use the Filter Tree to select tracks these groups/views to quickly identify tracks that you may not want to transfer between your libraries. By using SuperSync's Get Info, Compare Tracks, Track Comparison, Remove Duplicates, and Put in Trash/Empty Trash features, you can get additional info about your tracks so you can determine which files to keep, ignore, fix, and/or delete.
In addition to all the features listed above, SuperSync allows your library to viewed/listened to from any device that has a web browser. SuperSync's Web Server feature publishes your Local Library via a web interface. You can then point any computer with a web browser to special SuperSync website and view and listen to your content.
Note: SuperSync's Web Server feature is enabled by default but it can be disabled/enabled in SuperSync's Preferences window in the Network tab.
Tech Info: The SuperSync Web Server is typically only available to computers on your local network and not computers from outside your network (e.g. computers on the internet). If you wish to publish your Local Library to computer's outside your network, you will need to make sure your computer is accessible from outside your network. Please read the WAN section in this manual for more information.
We have now covered the basic concepts and features of SuperSync. Our next section, SuperSync Quick Setup Guide, provides step by step instructions on how to setup and use SuperSync for the first time.
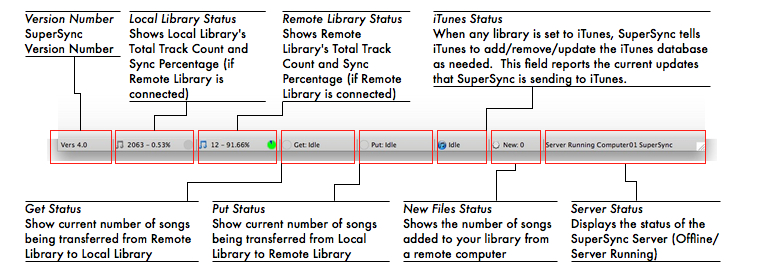
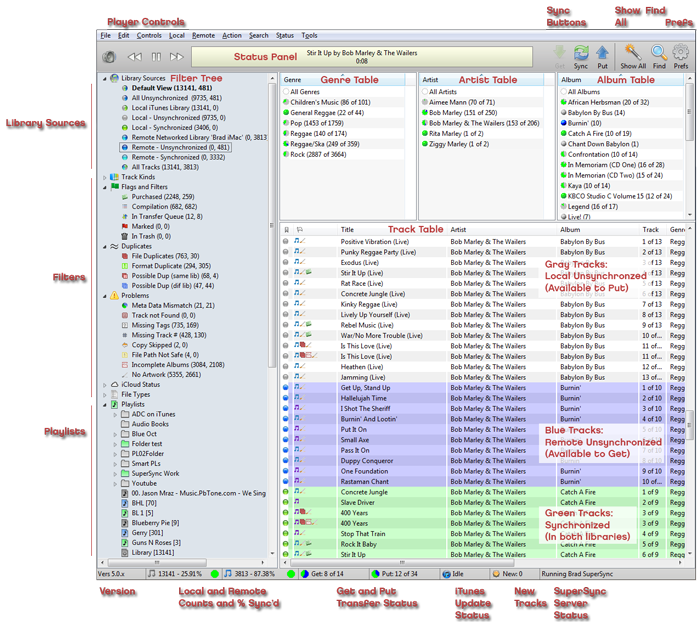
The SuperSync Window contains several different buttons, panes, lists, and tool bars for viewing status, sorting tracks, and controlling SuperSync. This section describes the different features of this window.
Note: In addition to this documentation, SuperSync uses "Tooltips" that allow you to get more information about a particular window control. Move and hold your mouse cursor over a status item/button/control in the SuperSync Window to get additional text description of that object.
The top of the SuperSync Window contains SuperSync's Music Controls, Status Pane, Sync Buttons, and Search and Preference Buttons.
Sync Buttons:Music Controls:
Volume adjustment, previous track, play/pause, and next track.Status Pane
SuperSync's Status Pane provides the current status/configuration of different SuperSync features. The information displayed in the status pane can be selected by selecting different commands under SuperSync's Status menu. You can scroll through the status display options by clicking on the pane.Note: The Status Pane changes dynamically as needed to show relevant status changes but you can the Status Pane by using the Lock Status command from the Status menu. The Status Pane can display the following information:
System Status: This option displays the SuperSync version number and how system resources are being used by SuperSync. You should never need to know the number of running threads or the maximum memory however this is useful if you experience a slowdown and you see you're out of memory, this could be useful in submitting a report or just signaling a restart.
The keyboard shortcut for this option is+1
Library Status: This option displays information about the tracks in each library.
The keyboard shortcut for this option is
Player Status: This option displays status of the SuperSync player, including current track time and name. The status pane is blank when this option is selected and no song is playing.
The keyboard shortcut for this option is
Server Status: This option displays status related to SuperSync when it acts as a music server.
The keyboard shortcut for this option is
Transfer Status: This option displays the status of any current uploads or downloads.
The keyboard shortcut for this option is
Selection Status: This option displays information about the currently selected track(s). Select a single track to see flag information. Select multiple tracks and see what can be synchronized.
The keyboard shortcut for this option isiTunes Status: This option displays iTunes connection information, including whether any updates are being performed. Selecting this item will trigger a check to see if the iTunes XML file has changed, and if possible, will rescan the library.
The keyboard shortcut for this option isThe last menu item, Lock Status: This option lets you keep the status pane on the current mode
Note: Clicking on the status pane will switch to the next status mode. SuperSync will try to switch the status to the most relevant mode unless locked.
The Filter Tree pane allows you to quickly select and view content from your library/libraries. This list puts your content into several categories: Library Sources (when viewing two libraries), Track Kinds, Flags and Filters, Problems, File Types, and Playlists. When you select a category, SuperSync will show all content within that category (e.g. selecting Music shows all your Music files, selecting File Duplicates shows all songs that have duplicates, etc). You can also right-click on a category and select the 'Filter These' command to filter/hide those tracks.
Tech Tip:
You can combine the Library Sources view with the Track Kinds, Flags and Filters, Problems, or File Types views to see tracks that match the combined criteria. For example, you can select "Local - Unsynchronized" and then select the "Movies" view to only show tracks that haven't been synchronized (criteria 1) that are movies (criteria 2). You can then select the resulting tracks in the track list and perform sync functions on those tracks.
The following is a list of the different sources/views within the Filter Tree and what they show:
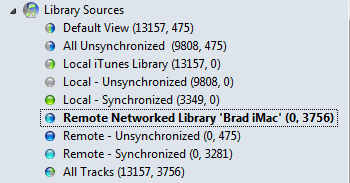
Library Sources - Library Sources is only shown if you are connected to a Remote Library. It is hidden when you are only viewing your Local Library. The following is the list of possible Library Sources:
|
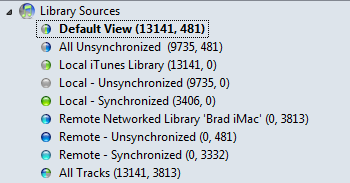 |
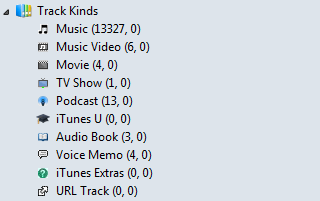
Track Kinds Filters
|
 |
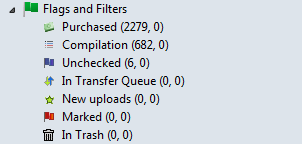
Flags and Filters
|
 |
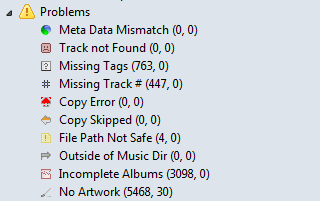
Problem Filters
|
 |
Duplicates Filters
|
 |
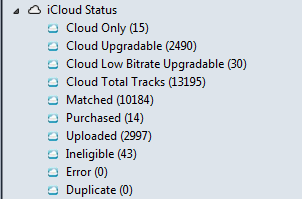
Cloud Filters : See Cloud Overview for more information.
|
 |
File Types View
|
 |
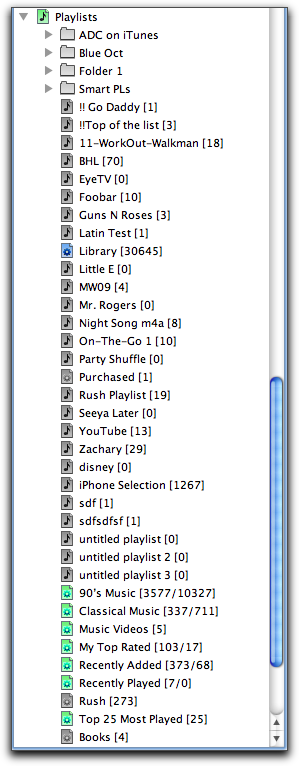
Playlist ViewIf your Local Library is an iTunes library, the Filter Tree will show your iTunes Playlists ('standard playlists' and Smart Playlists). If your Remote Library is also an iTunes library, the Remote library's playlists will also be shown. Playlists are displayed in fashion similar to iTunes' playlists. In SuperSync playlists are also color coded. Gray playlists are in the Local Library, Blue playlists are in the Remote Library, Green playlists are playlists that are in both library (but may not have the same tracks). SuperSync can synchronize playlists. For more information, read the Playlist Synchronization section later in this manual.
|
 |
Artwork PaneThe Artwork pane display a selected track's artwork if the track has artwork embedded within the file. You can show/hide the Artwork pane by using the selecting the Show Artwork command in SuperSync's Controls menu.
|
 |
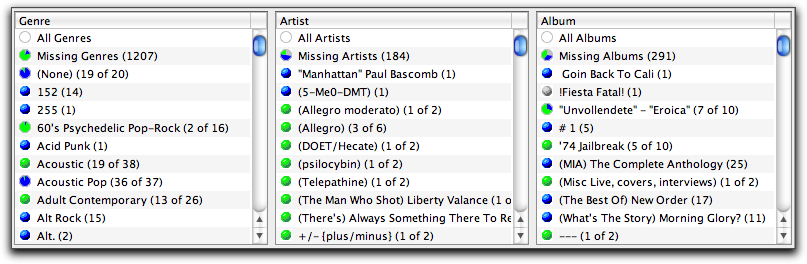
Genre, Artist, and Album Column BrowserAt the top of the Track List pane, you'll see the Genre, Artist, and Album Column Browser. Selecting an item in these columns displays all tracks matching that Genre, Artist, or Album. For example, if you Alternative from the Genre column, the Track List will show all tracks in the Alternative column. You can subsequently use the Artist and Album columns to refine your track listings. When you are done, click the Show All button to view all your tracks.
|
Track List:
More columns of track information can be displayed or disabled in the View tab in SuperSync's Preferences window.
|
Status FooterAt the bottom of the SuperSync window is the SuperSync Status Footer. This Status Bar displays the status of SuperSync and its various features.
The Status Bar contains the following fields:
|
All files in your library have a colored dot next to them:
![]() Gray dot means a local, unsynchronized track
Gray dot means a local, unsynchronized track
![]() Blue dot means a remote, unsynchronized track
Blue dot means a remote, unsynchronized track
![]() Green dot means a local synchronized track.
Green dot means a local synchronized track.
![]() Turquoise Green dot means a remote synchronized track, on your remote library. These tracks are usually omitted so that you don't see two of every synchronized track.
Turquoise Green dot means a remote synchronized track, on your remote library. These tracks are usually omitted so that you don't see two of every synchronized track.
Pie charts are used to give you an idea of how much of each album, artist, and genre are synchronized. Blue is remote library, gray is local, and green is synchronized.
Tracks in your library may have different "flags" associated with them. Flags can represent a state of the track that helps you manage your music. A short description is available for any track by setting the Status menu to Selection Status.
Set the Status menu to "Selection Status" and click a single track. For each flag icon, you'll see a brief description of the flag.

SuperSync tries to keep the flag information relevant, so only some information is displayed in the Track Table for each Track. Here are the flags and their meanings.
| Flag | Description |
| Local Unsynchronized - In local library and not remote library | |
| Remote Unsynchronized - In the remote library and not in the local library | |
| Local Synchronized track - This exact file is in both libraries | |
| Remote Synchronized track - This exact file is in both libraries. To avoid showing all synchronized tracks twice, this is normally filtered. | |
| File duplicate: The content matches another track. The tags and file name may not match. | |
| Not found on Disk: Track does not appear to be on the disk where it should be. A rescan is recommended. | |
| File exists only on the cloud. It must be downloaded (in iTunes) before it can be played or copied with SuperSync. | |
| Compilation: Music track part of a compilation | |
| No Track Number - An audio file without a track number tag | |
| File Copy Error; The file was not synchronized. May be network error, or read/write error. | |
| Incomplete; Not part of an entire album. A perfect track is part of a complete music album that has all the tags defined. Used for those who like to collect full albums. | |
| Possible Duplicate: Tags suggest track may be duplicated in the same library. | |
| Possible Duplicate: Tags suggest track may exist in the other library. | |
| Contains a file path that may not be legal on all computer systems. | |
| File is outside of root library path. Files outside the root path may be on an external drive or other location. | |
| In Get Queue; Marked for downloading from remote site or library | |
| In Put Queue: Marked for uploading to your remote library | |
| MP3 File Type | |
| M4A File Type | |
| M4A File Type | |
| AA/Audio book | |
| MP4 File Type | |
| Movie File | |
| Local Playlist | |
| Local Playlist | |
| In trash - To be deleted | |
The SuperSync Window can be modified in several ways. You can resize the Filter Tree column and Track List columns by moving your mouse cursor to the border of a column until your cursor changes to a resize cursor (![]() or
or ![]() ) and then dragging the border.
) and then dragging the border.
You can also control the Track List's font size and the columns shown in the Track List by. You can access these settings in SuperSync's Preferences in the View tab.
Now that you have learned about the SuperSync Window's features, you can proceed to the next section in our manual, SuperSync Menus. This next section describes all of the SuperSync's menus and their use.
Most of SuperSync's functionality can be accessed via the SuperSync Window but there are additional features available via SuperSync's Menu bar and contextual menus.
Tech Note:
The menu bar is the bar at the top of the SuperSync window that starts with the FILE menu. Contextual menus are menus that appear when your right-click within certain parts of the SuperSync window. Menu bars don't change but contextual menu bars may change depending on where you clicked within the SuperSync window.Important Note:
SuperSync's Menu commands are identical on both Mac and Windows. However, due to OS standards, certain commands are located in different menus. These differences will be noted.
Now that you have learned about the SuperSync's Menus, you can proceed to the next section in our manual, SuperSync Preferences. This next section describes all of the SuperSync's Preferences window and their use.
This guide walks you through the setup and syncing of two iTunes Libraries over a network using SuperSync.
For the purpose of this guide, we will be using the following scenario:
If you are using a different configuration, please read this guide since the concepts in presented here will also help you understand the basics of SuperSync. Other configurations, such as syncing with a network drive are discussed later in this manual.
Tip: Before attempting a complete synchronization, at least for the first time, you should synchronize only one or two files to make sure they're going where you expect them.
Note: All of the Quick Start guides below assume that you are using iTunes as your default local music library. Typically your Local Library is configured to us iTunes and you then connect to various "remote" libraries such as iPods,iPhones, disk drives, and other networked SuperSync libraries.
Note: The first time you launch SuperSync, SuperSync will ask you if you want to enable the SuperSync Server and setup a password for server access. If you see this screen, you can enter it now, or later in the next steps.

Note: If the SuperSync Server isn't running, confirm SuperSync's Preferences (Step 2). If you still have issues starting the SuperSync Server, see the Server Help and the Network Trouble Shooting Guide.
After selecting your Computer #2, SuperSync on Computer #1 will connect to Computer #2's library.
Note: You can initiate the connection from either computer since the SuperSync Server is running on both computers.
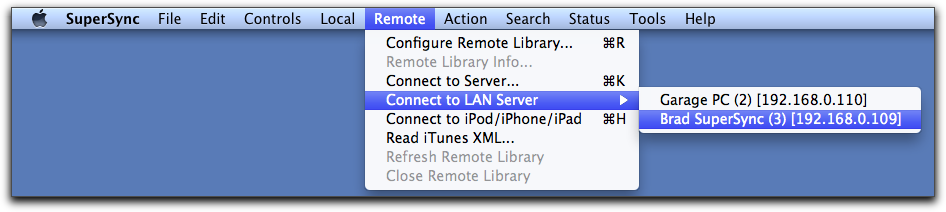
Tech Info: The Connect to LAN Server looks for other SuperSync computers via Bonjour. If you don't see your other computer, you can manually enter your other computer's IP address by using the 'Connect to Server' command in the Remote menu.
At this point, both libraries are connected. We will now use SuperSync to compare and sync content between the two libraries.
Now that you are viewing Computer #1 and Computer #2's libraries, we will use SuperSync's Filter Tree to quickly determine which songs need to be synced from either the Local or Remote library's point of view. To do this, follow these steps:
Now that you are have viewed your identified your unsynchronized tracks, we will use SuperSync's Get, Put, and Sync commands to move tracks between the two connected libraries. Since this is your first time syncing songs, we will start by selecting individual tracks to transfer between computers. We will later sync multiple tracks between your computers. To do this, follow these steps:
Note: The Transfer Status Window shows detailed information about your transferred files such as number of songs transferred, total size (in MB) of transfers, number of files skipped (due to duplication or errors), iTunes Updates (SuperSync telling iTunes to make updates to its database), etc.
You can confirm that your files were transferred successfully by opening iTunes on either computer. Please note that transferred files may not appear immediately since iTunes may take a few moments to complete its database updates. You can also use the ''Local Synchronized' and 'Remote Synchronized' views in SuperSync to see if your synced songs appear as 'synced' (with either a ![]() green dot or
green dot or ![]() turquoise dot).
turquoise dot).
Conclusion
At this point, you have connected two iTunes libraries on two different computers and synced tracks using SuperSync. This is the way SuperSync is most commonly used but there are many other ways of using SuperSync. You can use SuperSync to listen to your music, share/stream your music via web browser, copy songs from an iPod, iPhone, iPad, etc, sync and backup your data to an external drive, etc. The rest of this section quickly describes how you can sync your Local Library with other types of Remote libraries. It also describes different ways to access your libraries (e.g. via a web browser or via SuperSync across the Internet/WAN).
Additional Quick Setup Guides
Remove duplicates is covered in its own help chapter. Read it carefully before attempting to delete duplicate tracks.
Setting up SuperSync for iTunes Match help SuperSync work with tracks that are on iCloud.
We have now covered the most common way of setting up and using SuperSync. Our next section, The SuperSync Window, describes the SuperSync Window's features and use.
SuperSync's user preferences can be configured from the Preferences window. This window can be accessed by selecting Preferences from SuperSync's FILE menu (Mac) or EDIT menu (Windows) or by clicking the Prefs icon in SuperSync's toolbar.
This will open the Preferences window:
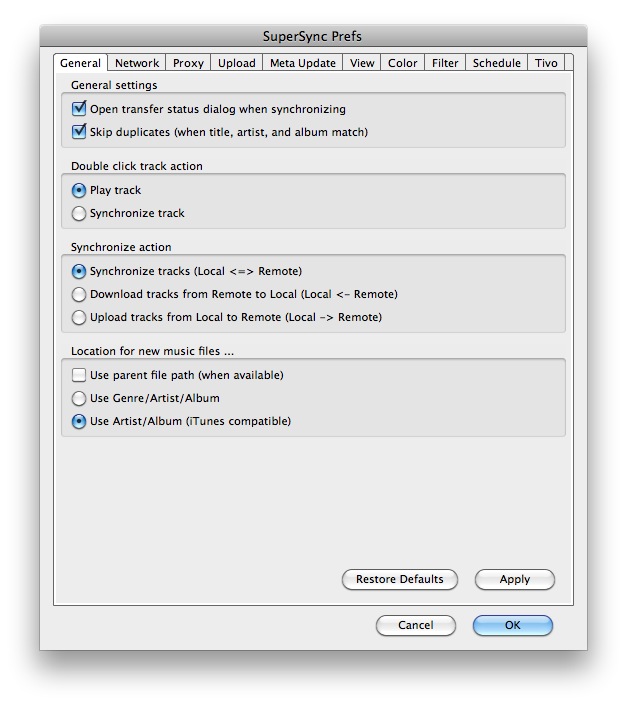
The Preference window contains the following tabs:
SuperSync's Preferences allow you to enable and customize various SuperSync features. In many cases, the defaults for these settings will meet your needs. When you are finished reading this section, proceed to the next section in our manual, Configuring the Local Library.
When you first launch SuperSync, SuperSync loads a 'Local Library'. This library is what will be used as a source and destination for tracks when Syncing. The Local Library is essential 'your library' and is typically located on your computer or on a hard drive connected to your computer.
By default, SuperSync uses your iTunes Library as its Local Library. However your Local Library can be set to use other types of libraries. If you plan on using iTunes as your library, you can skip to the Configuring The Remote Library section later in this manual. Otherwise, keep reading to learn about configuring your Local Library...
If SuperSync didn't find your iTunes library, or if you use another music player, you can follow the instructions below to import your music manually.
To configure your Local Library, go to SuperSync's LOCAL menu and select the Configure Local Library command. The Configure Local Library will open.
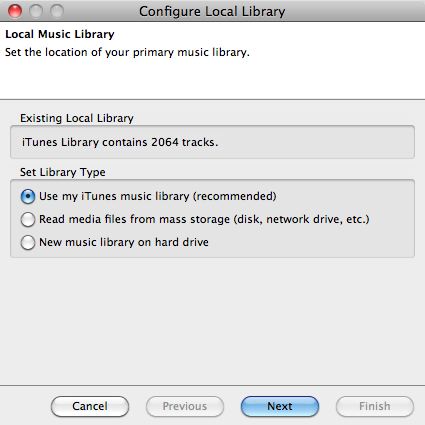
The Use my iTunes Music Library (recommended) option connects to iTunes and uses its library.
The Read Media Files From Mass Storage option uses folder/directory on any hard drive (e.g. a folder on your desktop or one on a USB connected hard drive) for the Local Library. When using this option, iTunes syncing features such as meta data (play counts, ratings, etc) are not enabled. Selecting the Next button will take you to a screen where you can specify the folder you want to use.
The New Music Library On Hard Drive uses an empty folder for your Local Library. The purpose of this option is to use a completely blank library that will receive tracks from a remote library for backup/mirroring purposes. When using this option, iTunes syncing features such as meta data (play counts, ratings, etc) are not enabled. Selecting the Next button will take you to a screen where you can specify the folder you want to use.
Important Note: For maximum integration with iTunes, set your local library to import and synchronize with iTunes.
[Return to the SuperSync Table of Contents Section in this manual]
SuperSync lets you see two music libraries at once - the Local Library and Remote Library. SuperSync connects to a 'Remote Library' and displays its contents side-by-side with the Local Library so that you can choose which tracks need to sync'ed, deleted, modified, etc.
In most cases, you'll be using the library from another SuperSync computer as your Remote Library. You can configure the Remote Library to different types of libraries such as a folder/directory on a network server, an iTunes Library on your computer but under a different user account, the library on an iPod/iPhone/iPad, or the library on a another computer running SuperSync.
Once you know what type of library you want to connect to, you can use the Configure Remote Library command (in SuperSync's REMOTE Menu) to set up the connection to that library. This will open the Configure Remote Library window.
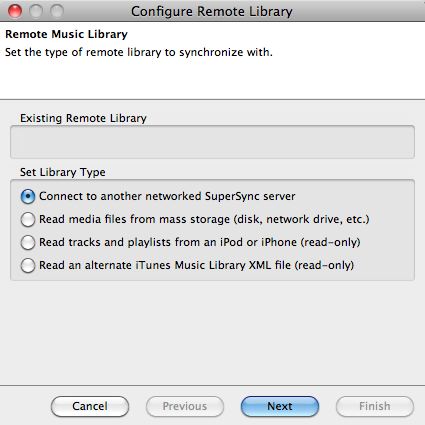
Select Connect to another networked SuperSync server to connect to another computer running SuperSync.
Select Read media files from mass storage (disk, network drive, etc) to connect a folder/directory that contains your music library.
Select Read an alternate iTunes Music Library XML File (read-only) to connect to an another iTunes based library via the iTunes XML file. The iTunes XML contains pointers to the actual location of the iTunes as well as meta data about the library such as star rating, play counts, etc.
Once you select and configure any of the library types listed above, you will be connected to that library and both your Local and Remote Libraries will appear side-by-side in the SuperSync Window. Once your Remote library is open, you can proceed to the Syncing Your Libraries section in this manual.
Quickly Connect To Common Remote Library Types
Once you know what type of Remote Library you want to connect to, you can skip the Remote Library Configuration screens and use the Connect to... and Read... commands under the REMOTE menu to quickly connect to that type of library.
Note: Before you can connect to another computer running SuperSync, you'll need to enable the server on another SuperSync that is configured with the library you'd like to sync to. To enable the SuperSync server, go to the section on Network Settings under the preferences.
In some cases, changes may be made to the Remote Library while you are viewing it. For example, say you are viewing a Remote Library on another computer and someone on the other computer imports a CD. To view these changes you can either close the connection to the Remote Library (by using the Close Remote Library command under the Remote menu) or you can simply go to SuperSync's Remote menu and select the Rescan Remote Library command. Any changes made to the library since the last rescan are reflected in the library display. This option is not available if a remote library is not connected or available.
[Return to the SuperSync Table of Contents Section in this manual]
SuperSync can connect to another computer running SuperSync if that computer has the SuperSync Server enabled.
To connect to a SuperSync Server over your (LAN) network, you can either:
This will open the Connect to Server window that configures the connection to a SuperSync Server.
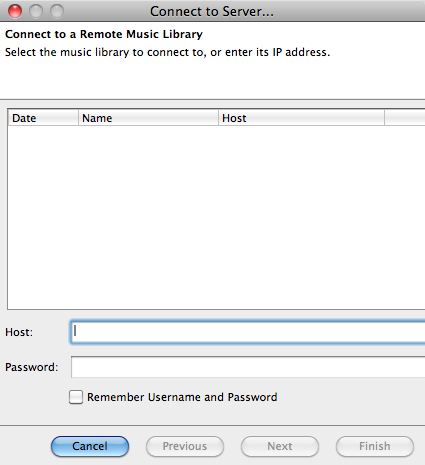
To connect to a networked SuperSync server, you need the host name/IP address/domain name, port number, and password (if the Server has a password set). Enter the host name/IP address/domain name in the Host field and, if needed, the server's password in the Password field. Click Next to proceed.
Tech Note: If the server is not running on port 5360, the SuperSync default, enter the IP address, a colon, then the port number, such as: 192.168.0.100:5000. In most cases, you will not need to change the SuperSync Server's port but some network administrators and users may want change this for various reasons.
Enable/Check the Remember Username and Password checkbox to connect to this SuperSync Server without having to continuously enter your password information.
Tip: Your password data will be saved in a text file in SuperSync's Settings Directory. While the passwords are encoded for protection they can be decoded with some effort. For this reason, we do not recommend you use commonly used passwords for your SuperSync Server passwords.
When you have entered the SuperSync Server's info, click the Next button and follow the on-screen instructions to connect to this Remote Library. Note, this window shows all the SuperSync Servers you have connected to so that you can quickly select and connect to a server.
Tip: You can connect to a SuperSync Server running on your local network (aka LAN) in one step by selecting that computer in the Connect to LAN server submenu in SuperSync's Remote menu.
Tip: Use the "Check my IP address..." command under the Tools menu to get your computer's IP address. You can then use this address to connect from another SuperSync computer.
Once you have connected this library, its contents will appear side-by-side with your Local Library in the SuperSync Window. You can now proceed to the Syncing Your Libraries section in this manual.
[Return to the Configuring the Remote Library Section in this manual]
Selecting the Read media files from mass storage (disk, network drive, etc) radio option in the Configure Remote Library window opens a window where you can set the location of the Remote Library.
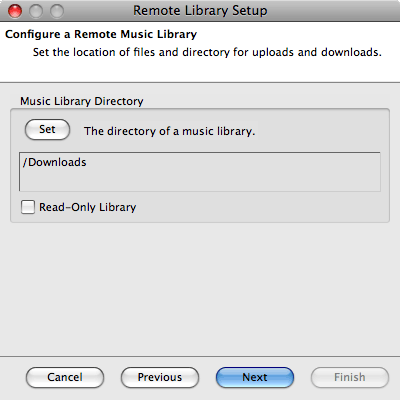
Click Set under Music Library Directory to select this select the folder/directory where your music library is located. To use an create a new music library from scratch, just select an empty folder/directory.
Click Next to continue the remote library configuration process. After clicking Next, a new window appears to give confirmation of any directory changes or to notify you that no directory changes were made. If you wish to select a different directory, click Previous to return to the directory selection window. Clicking Finish (only available from the confirmation window) saves any changes and closes the Remote Library setup and connect to this library.
Note: You can set this library to be a 'Read-Only Library'. This means that SuperSync can 'Put' tracks from this library into your Remote Library but it cannot copy tracks (aka Get) tracks into this library.
Once you have connected this library, its contents will appear side-by-side with your Local Library in the SuperSync Window. You can now proceed to the Syncing Your Libraries section in this manual.
[Return to the Configuring the Remote Library Section in this manual]
SuperSync can compare and retrieve tracks from another iTunes Library that is on a hard drive. You can use SuperSync to merge libraries that are on the same computer (in different accounts) or if you have several old computers with iTunes content, copy the libraries to an external disk and use SuperSync merge them into your main library.
This feature is useful if you want to import/backup an iTunes library that's on a hard drive or a different iTunes library on a different user account on your computer. For instance, if your spouse has some of your music in their library, you can retrieve tracks and playlists with a few simple steps.
To do this, use SuperSync to connect to an alternate iTunes XML Library as a remote library. Apple's iTunes creates this XML library and keeps it up to date in each account's Music directory. SuperSync can read the library and help you compare and merge the remote tracks into your SuperSync/iTunes library. iTunes Libraries accessed this way are read-only meaning that you can transfer tracks, playlists, meta data, etc into your library but you will not be able to modify the contents of a remote iTunes library. You can run SuperSync in multiple accounts and connect from one account to another account's library and do two-way syncing, one account at a time.
If you are going to connect to an iTunes library in another account, see the note below about setting up account permissions.
To access the alternate iTunes XML file, you can either:
Note: the iTunes XML file is typically located in the iTunes folder (that is usually in a folder called Music). If you are accessing the file that is another user's account, locate that user's account folder and then find the iTunes or Music folder within the user account folder.
Once the alternate iTunes library is connected via SuperSync, its contents will appear side-by-side with your Local Library in the SuperSync Window. You can now proceed to the Syncing Your Libraries section in this manual.
Note: iTunes libraries connected this way are read-only. This means that you can transfer track from this library to your Local Library but SuperSync cannot put tracks into this library.
Accessing an Alternate iTunes library XML file on a different user account requires that your account have privileges to access the folder/directory where that iTunes XML file and linked music library are located.
As a security measure, account A can't access the music on account B. However, account B can grant read access privelege to the user of account A. To do this, account B user will need to log in and add A to the list of users who can access the music library.
To do this, locate the iTunes XML file for account B, and the location of the music directory that the iTunes content resides in.
Select the parent directory of both files and right-click to "Get Info" for the directory. Add read-permission for the user A who you will be allowing access to your music via SuperSync.
If you want to sync in both directections (allow user B to access user B's music) user A will need to grant read-permission to their music library folder(s) for user B.
[Return to the Configuring the Remote Library Section in this manual]
Synchronization is the primary function of SuperSync. It allows you to grab and play music files from different libraries, either locally (on your machine's hard drive) or remotely.
Tracks are color coded by SuperSync: ![]() Gray=Local Track,
Gray=Local Track, ![]() Blue=Remote Track,
Blue=Remote Track, ![]() Green=Synchronized (in both)
Green=Synchronized (in both)
The three buttons in the upper right are used to synchronize tracks and playlists:
![]() Get
Get
Use the "Get" button (or action) on a Blue (Remote) track to get it from the remote and copy it to your Local (iTunes) library.
![]() Put
Put
Use the "Put" button (or action) on a Gray (Local) track to put a copy on the remote library. The remote library can be another SuperSync, a directory of music. Putting is not allowed on "read-only" libraries such as iOS devices. Putting tracks to a Remote SuperSync library requires that the upload settings are set to allow track uploads.
![]() Sync
Sync
The Sync button acts as a "Put" on local unsynchronized tracks, and acts as a "Get" on Blue remote tracks. It is the equivalent of pressing the Get and Put buttons and is a handy way to copy any unsynchronized track.
In all cases, when able, SuperSync makes a physical copy of the track you are getting or putting, making it available in both libraries.
iCloud
iCloud and iTunes Match users: You'll need to use iTunes to download any tracks that you want to access with SuperSync. We recommend having a master library with all of your cloud tracks downloaded so they can be sync'd with other machines.
Synchronization of Tracks
Blue and Gray tracks can be selected for
synchronization by selecting the track and then clicking either the Get, Put, or Sync button in the SuperSync window. You can also access these commands by right-clicking a track and selecting the Get, Put, or Sync actions. Multiple files can be selected in a range by holding down Shift while clicking or by individually added to the selected group by
holding down Command (CTRL on Windows) when clicking.
If the Get, Put, or Sync buttons are disabled (grayed out) and you have selected an unsynchronized track, the synchronize action may not be allowed due to several reasons. Check the "Selection" in the Status menu to see an explanation.
During the synchronization process, SuperSync copies the
selected track(s) into the designated library (Remote or Local depending on which direction the track is being copied). The
status of this transfer is displayed in the Transfer Status Window that opens when you begin a Sync action. This window can also be displayed by
pressing +T or selecting Transfer Status from SuperSync's File menu.
Step 1:
Open a remote library from the Remote menu. You should see both libraries overlaid, with tracks color coded by Local Only (Gray), Remote Only (Blue), or Synchronized (Green/Teal).
Step 2:
Select a Blue (Remote) track and click the "Get" button to Transfer it to your Local iTunes library.
Select a Gray (Local) track and click the "Put" button to Transfer it to the remote library. The library must be accessible and writable. (iOS libraries are not modifiable. Remote SuperSync libraries may be set to "read only" or disallow Track uploads, a setting that can be changed in the "Upload Preferences".)
Step 3:
Once a track has been synchronized, it should turn green, meaning that it is in both libraries.
Verify that the file you just copied was copied from one library to the other. Make sure it has been saved in the location that you expect.
Once you are happy with the results of a single "Get" or "Put" operation, you can select more tracks to "Sync". The Sync button will "Put" any gray tracks and "Get" any blue (remote) tracks.
Before you Sync multiple tracks, it is highly recommend that you select just one or two tracks to sync. Sync them, and make sure they are going into the other library as you expect.
Use the General Settings to set the location of files added to your library by SuperSync.
You can easily get, put or synchronize multiple tracks at one time. For instance, to sync all tracks by a particular artist, select the name of the artist in the Artist Table and click the Get, Put, or Sync button.
You can also select all tracks (using Select-All from the Edit Menu). From there, you can click the Get, Put, or Sync buttons. However, we would caution you to only do this after you are an experienced SuperSync user.
[Read the Syncing Meta Data Section in this manual]
[Read the Syncing Playlists Section in this manual]
[Return to the SuperSync Table of Contents Section in this manual]
SuperSync helps you sync your playlists from one library to another.
To get a playlist from a remote library, that library must be open in SuperSync as a Remote Library. Remote libraries that support playlists are SuperSync Networked Libraries.
First, make sure that you see the Playlists in the left hand SuperSync Tree. Under the Controls menu, you can make sure that Show Playlists is checked.
Color coding is used to help identify Remote, Local, and Synchronized Playlists.
Blue Playlists ![]() , Smart Playlists
, Smart Playlists ![]() , and Folders
, and Folders ![]() are only on the remote library.
are only on the remote library.
Gray Playlists ![]() , Smart Playlists
, Smart Playlists ![]() , and Folders
, and Folders ![]() are only on your local iTunes library.
are only on your local iTunes library.
Green Playlists ![]() , Smart Playlists
, Smart Playlists ![]() , and Folders
, and Folders ![]() are in both libraries.
are in both libraries.
Select a playlist and you'll see the tracks that are in the playlist.
The three buttons in the upper right are used to synchronize tracks and playlists:
![]() Get
Get
Use the "Get" button (or action) on a Blue (Remote) playlist ![]() to get it from the remote and copy it to your Local (iTunes) library. Any tracks that are needed will be downloaded first.
to get it from the remote and copy it to your Local (iTunes) library. Any tracks that are needed will be downloaded first.
![]() Put
Put
Use the "Put" button (or action) on a Gray (Local) playlist ![]() to put a copy on the remote library. The remote library must be another networked SuperSync library. Putting is not allowed on "read-only" libraries such as iOS devices. Putting a playlist to a Remote SuperSync library requires that the upload settings on that machine are set to allow track uploads.
to put a copy on the remote library. The remote library must be another networked SuperSync library. Putting is not allowed on "read-only" libraries such as iOS devices. Putting a playlist to a Remote SuperSync library requires that the upload settings on that machine are set to allow track uploads.
![]() Sync
Sync
The Sync button acts as a "Put" on local unsynchronized tracks, and acts as a "Get" on Blue remote tracks. It is the equivalent of pressing the Get and Put buttons and is a handy way to copy any unsynchronized track.
If you are replacing the contents of a Playlist that already exists, you will be asked if you want to do so. Always read the "Are you sure..." warnings carefully. If you are not sure, say no!
Syncing Smart Playlists is covered in the next section.
[Read the Syncing Tracks Section in this manual]
[Return to the SuperSync Table of Contents Section in this manual]
Synchronizing multiple music libraries can be tricky if your music is not well tagged or has come from many different places. Files may be missing identifying tags, some tags may be out of synch, or named slightly differently, or the same album may be encoded different ways. Managing a large library may take several iterations of pruning, copying, checking, and re-importing.
As a general rule, synchronize a few tracks initially and make sure they transfer to the right location. Click "Show All" to force an update... and check that they show up in iTunes, if you're using iTunes.
[Read the Synchronize Meta Data Tips Section in this manual]
[Return to the SuperSync Table of Contents Section in this manual]
SuperSync has a powerful utility to help track down modified tracks that differ in two libraries. The Meta Data Updater allows you to find tracks that contain the same music data but the meta tags are different.
Meta tags are fields inside a music or video track that describe the data on the track. For instance, album name, artist, genre, track number, disc number, year, composer, etc are all MP3 tags. Ratings and Played Counts is meta data that is only stored by iTunes, but can still be tracked and sync'ed by SuperSync.
You have one track in two libraries. But in one library, you modify some of the tags -- for instance you correct the spelling of the artist. The next time you connect to both using SuperSync, those two tracks should show as sync 'd with the meta data mismatch flag set.
To sync the meta data on both libraries, you would select the track that has the meta mismatch flag icon set, and right click on the track (or use the Action menu) to select "Update Meta Data". A dialog will let you verify the direction of the tag updates (updating the local or remote library version). Click yes to confirm and the file should be updated in SuperSync and in iTunes in both libraries.
To see the differences between the tracks, select the track and use the "Compare Tracks" under the Action menu. The Compare Tracks feature can be used to compare any two selected tracks, or if only one track is selected, it will let you compare the closest match. Use Get Info to access all similar tracks associated with a track.
![]() This feature it will modify the tags of your music. Use only on a few tracks at a time and verify the changes are what you expect.
This feature it will modify the tags of your music. Use only on a few tracks at a time and verify the changes are what you expect.
To use Meta Data Updating, you need to sync between two networked SuperSync applications. Both SuperSync applications must have their Local Library be configured as an iTunes library. An upload password is required, and the "server" must be configured to allow remote changes.
Configure the meta data update feature in SuperSync by going to the Meta Data Settings in the preferences. You can also allow or deny letting remote users modify your meta data in the Upload tab. in the Preferences window.
Files that have mismatched meta data will have the ![]() icon. Select the track and right-click update meta data or select that from the Action menu.
icon. Select the track and right-click update meta data or select that from the Action menu.
A dialog will prompt you about what changes you can make:
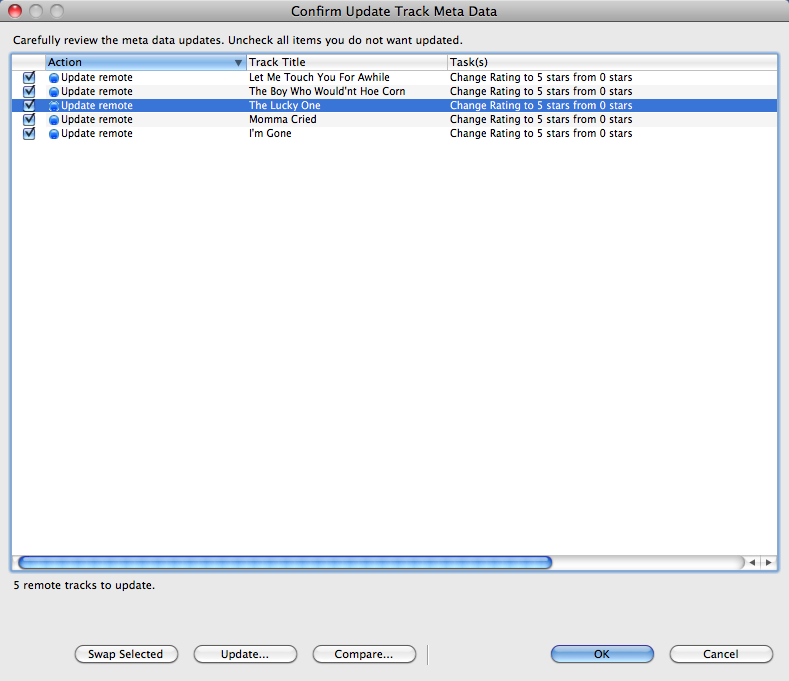
Carefully go through the list of suggested changes.
Swap lets you change the direction of changes. SuperSync takes a guess as to what changes you want to make but sometimes you'll may want to to manually change which track you're updating.
Once you are satisfied with the checked items, click the OK button to start the process of updating the tracks. Tracks will either be updated on your local iTunes library, or on the networked remote SuperSync/iTunes library.
If you want to get more details about a particular track, select the track and click the Update... button. A dialog will display the changes and individual meta tag updates can be enabled or disabled.
Swap lets you change the direction of changes. SuperSync takes a guess as to what changes you want to make but sometimes you'll want to manually change which track you're updating. In the rare case where you want to update some items in one direction and other meta data items in the other direction, you can do this by updating the meta data twice - selecting the items to move by checkbox.
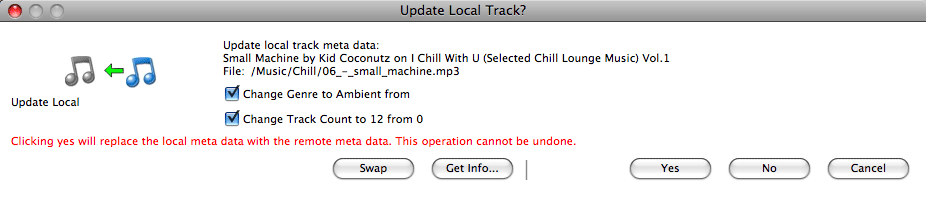
Get Info... to learn more about the two tracks you are working with. One track will be a local iTunes track. The other will be a remote networked SuperSync library.
Yes - Initiates the copy of meta data transfer. This will show a progress dialog until it is complete or returns an error message.
No - Skips this item and does not update anything.
Cancel - Exits all meta updates if others were selected for updating.
Be sure to read the warning dialog and confirm your updates carefully. These changes cannot be undone. If you accidentally set the meta data to an incorrect value, you'll need to manually go into iTunes and update the tags from iTunes get Track Info dialog.
Use care when allowing remote updates to your library. Be sure you trust the users who have upload privileges.
If you are making changes to your one library but do not want to accidentally modify the other library, you can set your library to read-only access in the Meta Data Settings.
SuperSync does not do the actual updating of meta data -- we pass the request to iTunes. If iTunes cannot do it, an error will be returned. Some tracks are not modifiable, so some error messages may be "normal".
Note:
The UPDATE META DATA command is only available when a) two libraries are connected within SuperSync b) a track is in both libraries but some meta data is different (as shown by the meta data icon) and c) at least one of those tracks is selected.
The easiest way to update these tracks is to first select the META DATA MISMATCH view in the SuperSync Filter Tree, select a track and then select the UPDATE META DATA command from the ACTION menu.
[Return to the SuperSync Table of Contents Section in this manual]
The transfer window is one of the best ways for you to get a picture of what is going to be transferred from one library to another.
In the transfer window, you'll see the number of tracks to be copied, the size of your library, and the general progress of file transfers. As new files are set to be synchronized, they will be added to either the upload or download queue. Remember, uploading is sending files from the local library to the remote library and downloading is getting music from the remote library and adding it to your local library.
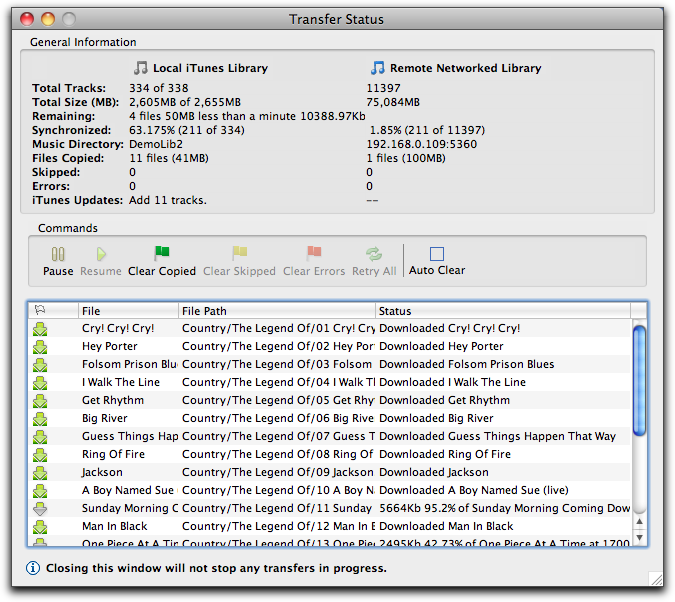
Total Tracks is the number currently in your library. If transfers are in progress, the total number after all are synchronized.
Total Size is the current size of your library, and the total size predicted when synchronization is complete. You can use this total size number to help determine how many more tracks can be added to a library of a fixed size.
Remaining shows the number of tracks, bytes, and time remaining for transfers.
Synchronized shows the percentage of synchronized tracks currently in your library. This percent should increase with each track copied.
Music Directory is the root directory of your libraries, or the IP address of the remote server. Hold the mouse over this field and you'll see a full description of the file path.
Files Copied shows the number of files successfully transferred and their combined size.
Skipped shows the number of tracks that were skipped, due to a similar duplicate, exact duplicate, or because the receiving SuperSync has upload restrictions
Errors are the number of tracks that did not copy due to some kind of error. This could be a simple communication error that retrying might fix, or it could be the source file is missing, or some other error.
iTunes Updates shows the number of tracks needed to be added and or removed from iTunes. When a file is added to a SuperSync library that is linked to your iTunes library, it will need to be added to iTunes. Likewise, when you empty the trash of any local tracks that are in iTunes, they'll need to be removed from iTunes after being deleted from SuperSync. To pause iTunes updates, select File > Pause iTunes Updates from the application menu .
Server Updates shows the number of tracks needed to be added and or removed from your SuperSync server, if enabled. Server updates help keep the library on your disk in sync with the library that is accessible via the network. To pause server updates, select File > Pause Server Updates from the application menu .
The commands available in the Transfer Window help you manage your synchronization process.
You can Pause and Resume the synchronization process. The pause command will pause uploads and downloads. (If you want to pause iTunes Updates, you'll need to do that under the File > Pause iTunes Updates menu.)
The Clear Copied button lets you clear successfully copied files from the table of copy operations.
The Clear Skipped button clears all tracks in the transfer table that were skipped.
The Clear Errors button clears all transfers that did not complete due to any type of error.
To automatically clear successful transfers, enable the Auto Clear check button. This keeps the window free from items that should not need your attention.
Each item in the table can be right-clicked to get further information and access additional commands. The first command is "Get Info" (to show transfer details and status, plus the standard track information.) Retry lets you schedule a transfer for another attempt. You can also Remove any individual transfer.
indicates files that are being sent to your designated new music directory. The Upload Synchronize Queue reflects the status of files being uploaded to the remote server. Both transfers can be paused by clicking the Pause button. Pausing the queue will pause further processing after a file finishes copying.
When a file has been synchronized (existing on both local and remote libraries), it appears in the main viewer window with a green sphere in the Source column.
If a remote library does not support uploads (read-only) then the upload queue will be unavailable. Read-only libraries include imports from read-only media (CD/DVD media), iPods, and DAAP servers that have uploading disabled. Currently, only SuperSync supports DAAP music uploads.
[Return to the SuperSync Table of Contents Section in this manual]
SuperSync for many NAS systems is available to download from the SuperSync.com web site. However, some NAS systems have their own update mechansim and are available through the web interface.
If you downloaded the SuperSync for NAS application, use your NAS's application installer to install or upgrade SuperSync.
See Installation Notes for more details.
The set of instructions to configure SuperSync Server are common for all the NAS systems. Hence, all NAS users should follow the steps below.
SuperSync Server intelligently integrates with NAS to automatically identify your music directories on NAS. However, you can also manually configure the same through the admin interface of SuperSync Server.
The web admin interface of SuperSync Server allows you to:
To access the Web Admin Interface, once the SuperSync server is installed on your NAS, follow the steps below:
The first time you run SuperSync on your NAS, it will do a library rescan. This can take a while, and you'll see the progress of the scan in the Admin page.
Setting passwords for SuperSync is used to protect access to your media library.
There are two types of passwords: SuperSync application, and web passwords. The first type is used when you connect from the SuperSync desktop to the NAS SuperSync. Web Passwords allow users to access the web player and web admin pages.
If you lose your password, you'll need to reset it. One way is to delete the SuperSync app from your NAS and re-install it. However, you'll all settings (but not your media files.) You can also delete the SuperSync etc/users.json file using the Terminal. This is somewhat advanced and requires terminal access to the NAS and command line experience. Roughly, the steps are:
The set of instructions to configure SuperSync Server are common for all the NAS systems. Hence, all NAS users should follow the steps below.
Copy, Sync & Manage iTunes music on NAS using SuperSync Server
To access, copy and manage iTunes music on NAS from your local Windows and Mac, you need the Desktop version of SuperSync.
Connect from the desktop SuperSync to the NAS SuperSync and you can instantly see which tracks are on the NAS, which are on your desktop, and which are in both and "synchronized". The missing tracks can be transferred either ways.
SuperSync Server and SuperSync Desktop communicate smartly and intuitively with each other within your local network to automate and simplify your entire iTunes music management within the network.
The SuperSync Desktop version on your PCs and Macs, along with SuperSync Server on NAS, allows you to:
To Copy, Sync & Manage iTunes music on NAS from your local Windows and Mac computers, follow the steps below:
Learn more about the Sync-Merge-Manage process of SuperSync Desktop.
You can also directly Sync-Merge-Manage your iTunes music across your desktop/laptop computers using the respective SuperSync Desktop versions.
If you have any questions, need help understanding the process or have a generic query, please feel free to contact our support team.
Using a shared network drive for iTunes is a good way to have multiple computers share a common music library. However, some care should be used to get the best experience out of iTunes and SuperSync.
Two types of users can share music from the shared drive. At least one master library user is needed for full NAS access by both user types.
Master Library Users have their main iTunes library pointing to a shared network drive. All Master Library users will have access to all of the tracks on the disk.
Subset Library Users have a subset of the Master library on their computer and do not access the network drive directly within iTunes. This type of user is good for laptop users, since you want to keep access to your network library when you're not connected to the network drive. Subset library users can get and put music to the master library over a network.
To begin, you'll need to have a network drive that is accessible by all machines that you want to have complete access to the master library. We recommend using a NAS that has AFP and/or SMB support. The drive should automatically connect on reboot (See final notes below if it doesn't).
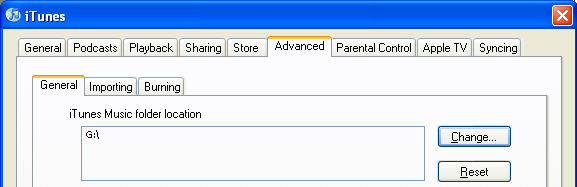
In iTunes, set the library location to point to the directory on the NAS where you have your media library. To do this, go to iTunes, Edit Preferences, click on the Advanced tab, then change the "iTunes Music Folder" location. In the screen image below, we have the NAS mapped to the "G:\" drive, however on a Mac it can be a network URL or other mapped network location.
If you have your library pointing to your default music directory, you may need to move the content to the new location. Warning: once you change the location of your library, moving the tracks to the new drive location may cause you to lose your playlists, ratings, play counts, and other iTunes specific meta data. However, selecting the checkbox "Automatically keep my Library Organized" in iTunes may help.
Once this is complete, run SuperSync and go to File: Local Library Info. Verify that Kind is set to iTunes and Music Directory is set to the location of your network drive and directory.
Next, you may want to do a File: "Local Library Rescan". Verify the results and make any recommended changes you wish.
You can repeat this process on multiple computers around the office or house that you want to act as Master Library Users.
At this point, the only problem is that when tracks are added to or removed from the network drive by any computer or user, those changes will not automatically show up in all the other user's iTunes.
Any time music is added or removed to/from the network drive, a Rescan Local Library will be required on each computer that is running as a master user and has an out of date iTunes. The rescan feature can be run manually as needed or can be scheduled to run periodically. We recommend doing it manually and always make sure the network drive is attached and online.
![]() If you have multiple "master library" machines connected to the same network drive as described above, you should not transfer tracks between the two libraries using SuperSync's Remote Network access. This is because both machines are pointing to the same drive location, so copying files could result in duplicates, especially if either computer has not recently been rescanned. Instead, local rescans should be used to find new music added to the network drive. You can still use SuperSync to connect to a remote library that points to a completely different networked SuperSync library, or connect to another disk drive or iPod.
If you have multiple "master library" machines connected to the same network drive as described above, you should not transfer tracks between the two libraries using SuperSync's Remote Network access. This is because both machines are pointing to the same drive location, so copying files could result in duplicates, especially if either computer has not recently been rescanned. Instead, local rescans should be used to find new music added to the network drive. You can still use SuperSync to connect to a remote library that points to a completely different networked SuperSync library, or connect to another disk drive or iPod.
Synching Playlists Between Master Libraries
Advanced users who are careful can attempt to sync playlists as a remote share. To do this, connect to a master library using SuperSync's Remote Network access.
DO NOT SYNC TRACKS IF BOTH MACHINES ARE SET TO USE THE SAME NETWORK DRIVE.
However, if the tracks are synchronized, you can select a preset and "get" it or "put" it.
Subset Library Users
Having a subset of the music from the master is ideal for users who don't want to have all the music from the NAS on their computer. If you've got a laptop, you almost certainly want to set your library up as a subset of the master.
Running iTunes as a subset of the master library requires no additional setup on iTunes. iTunes should have your library location in the default location or somewhere on a local hard drive.
Next step is to load SuperSync and make sure that your local library type is set to iTunes and your library location is correct from the File: Local Library Info... dialog.
To connect to the NAS drive, there are two ways. Connect to Remote Networked SuperSync library, or set the remote library up as a disk-based Remote library.
The recommended way is to connect to another remote networked SuperSync on the LAN that is set up as a master user. (See above!) This allows you to quickly connect to the master library and access iTunes specific information, including playlists, ratings, and video information. To connect to a master library, go to the Remote->Connect to a LAN Server menu. If you need to, you can also connect to the server by entering the IP address of the server into the Connect to Server... dialog. The remote machine you are connecting to must be running the SuperSync server and firewalls may need to be modified to allow SuperSync traffic.
The second method of accessing the music on the NAS is to set the remote library as a disk share under the Remote->Configure Remote Library... dialog.. Point SuperSync to the location of your NAS media directory. Clicking Finish will import the tracks from the NAS into SuperSync. From there, tracks can be added to your library or uploaded to the NAS using the standard synchronization techniques.
One question we get a lot: Can I have set up a computer with both types of libraries - so that I have a full time connection to my music when I'm at home, but also have a subset of music for when I take my laptop out of the house? The answer is.. sort of! You could use iTunes support for multiple libraries.. Or connect to the master library using Apple's "Home Sharing".
One tip we can share is that sometimes when you reboot a computer, the network share is offline. When you start iTunes with it pointing to the offline directory, iTunes won't be able to find your music. To prevent this, you can create an alias (or Windows shortcut) of your iTunes application, save it somewhere on the network drive, then use that to start your application. If your hard drive is offline, your Mac or PC should prompt you to connect the drive!
[Return to the SuperSync Table of Contents Section in this manual]
[Return to the Troubleshooting Section in this manual]
The Library Overview Window is accessed from the File menu, or -B, and provides an overview of one or two of your libraries.
On the left is your local (usually iTunes) library. On the right is the Remote library, if open.
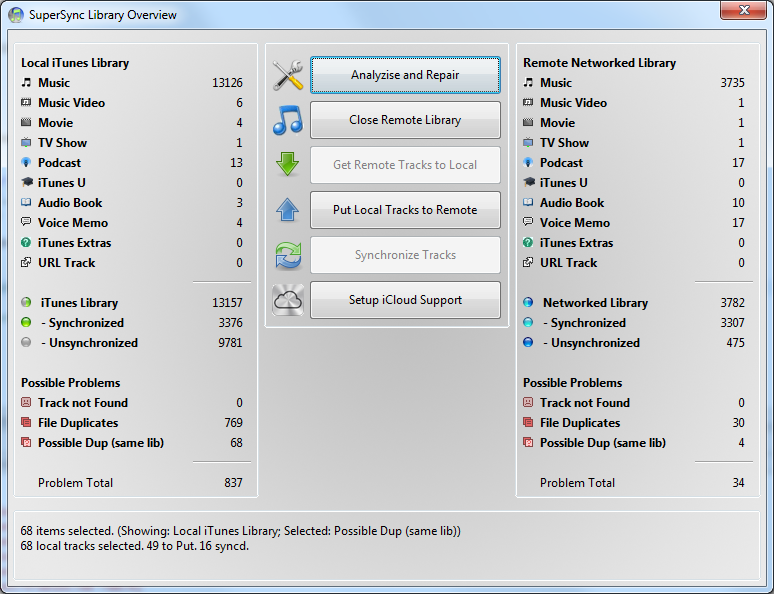
Hover over any statistics and you'll see a description of the filter, how many matches there are, and how many tracks can be synchronized.
Click on a statistic and matching will be displayed in the main window. The Get, Put and Sync buttons will be updated to work on the tracks visible in the Main Window.
Before doing synchronizing, we recommend you Analyze and Repair your library and Remove Duplicates.
Any time a track gets moved, added, or deleted, there is a chance that your libraries (as maintained by iTunes) may be out of sync with what is actually in the library. For example, if you move a folder full of songs into a library outside of iTunes or if you manually delete some tracks from your music library folder outside of iTunes, iTunes will not know about these changes and neither will SuperSync. This causes 'orphan tracks'. If you try to play or view a track that is not there/orphaned, the track will be marked as "Not there" and it won't be played.
SuperSync's Rescan Local Library looks for these changes and updates your Local Library (and iTunes if your Local Library is set to iTunes) with the changes.
To use this feature, go to SuperSync's LOCAL menu and select the Rescan Local Library command. This will open the Rescan Options window.
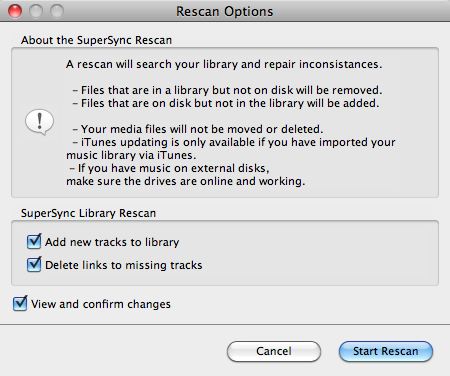
Set the 'Add New Tracks To Library', 'Delete Links To Missing Tracks', and 'View and Confirm Changes' checkboxes and then click the the Start Rescan button.
Rescanning a Local Library will take some time depending in the size of your library.
Note: We recommend that you enable/check the 'View and Confirm Changes' check box the first time you use this feature.
[Return to the SuperSync Table of Contents Section in this manual]
Removing duplicates is one of the most common frustrations of managing a large collection of music.
SuperSync offers several tools to compare tracks and remove duplicates.
Removing Tracks by adding them to the SuperSync trash and/or deleting them from iTunes involves the risk of losing a track you wanted to keep. Always back up your library and proceed with caution when adding tracks to the trash or removing them from iTunes.
The SuperSync tools for duplicate removal are: Duplicate Flags filters, Track Comparison Dialog, and "Remove Duplicates..."
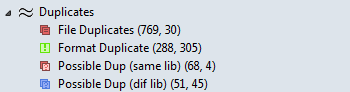
On the left hand tree, you should see a group of filters called "Duplicates". If you don't see them, enable the "Show Filters" from the Status Menu.
Select a filter to view the tracks that match. The two numbers in parenthesis show the counts for the local, remote libraries.
![]() File Duplicates Displays tracks that
are duplicates based on file size, CRC, format, etc.
File Duplicates Displays tracks that
are duplicates based on file size, CRC, format, etc.
![]() There may be some file duplicates that you do not want to remove, for instance, iTunes Match will often return the exact same song when the song is on two albums (e.g. a Greatest Hits album and the original). Here your library will contain two bit-for-bit copies of the music, but the tags will have two different albums listed. In that case, deleting the duplicate is not recommended, so that you can keep your albums complete.
There may be some file duplicates that you do not want to remove, for instance, iTunes Match will often return the exact same song when the song is on two albums (e.g. a Greatest Hits album and the original). Here your library will contain two bit-for-bit copies of the music, but the tags will have two different albums listed. In that case, deleting the duplicate is not recommended, so that you can keep your albums complete.
![]() Format Duplicates are tracks appear to be in both AAC and MP3 format. Some people want to have both an MP3 and AAC format, but some people only want one or the other, or the highest bitrate version available.
Format Duplicates are tracks appear to be in both AAC and MP3 format. Some people want to have both an MP3 and AAC format, but some people only want one or the other, or the highest bitrate version available.
SuperSync always will prefer to keep the highest bitrate songs.
![]() If you prefer AAC or MP3, SuperSync may recommend deleting in your preferred format. Always check the results and proceed with caution.
If you prefer AAC or MP3, SuperSync may recommend deleting in your preferred format. Always check the results and proceed with caution.
![]() Possible Dup (same lib) are tracks
that are possible duplicates in the same library where artist, album and title match.
Possible Dup (same lib) are tracks
that are possible duplicates in the same library where artist, album and title match.
Possible duplicates have similar tags, are within 1.5 seconds in length, and might be duplicated in your library.
![]() These duplicates require the most care to make sure you don't erase something by mistake! Due to the large number of similar sounding artists, albums, and tracks, SuperSync can mis-identify possible duplicates.
These duplicates require the most care to make sure you don't erase something by mistake! Due to the large number of similar sounding artists, albums, and tracks, SuperSync can mis-identify possible duplicates.
Select just a few tracks at a time and watch out for mismatched tracks by looking at the track to keep followed by the tracks to delete (marked by the trash icon.)
![]() Possible Dup (dif lib) are tracks
that are possible duplicates across two libraries. The Remove Duplicates feature only works on tracks that are in the same library.
Possible Dup (dif lib) are tracks
that are possible duplicates across two libraries. The Remove Duplicates feature only works on tracks that are in the same library.
More Duplicates may be in your library that SuperSync does not detect. This is usually because the tags (title, album, artist, etc) are different in the two tracks. You will need to identify these on your own, usually by sorting by Album and Artist and scanning visually for duplicates.
Use the Track Comparison tool to look at possible duplicates. This window can be accessed by the Action menu, or by using = (equals). Select any track, and if it has duplicates, those will be available to compare in the comparison window. You can use this tool to put one or the other track into the trash for removal.
SuperSync has a featured called Remove Duplicates... available from the Action menu. SuperSync will go through the selected tracks and try to find duplicates that you may want to delete. These tracks are put in the trash, and you are given the opportunity to view the changes and either keep them in the trash or remove them from the trash. Later you will you have the option to Empty the Trash from the Action menu.
First, if you're using Apple's Match/iCloud service, please make sure you've read about using SuperSync with iCloud. This will explain the extra steps required to "empty the trash" and help keep your Cloud Tracks in order.
We recommend you fix duplicates in your local library first. Select Close Remote Library from the Remote menu if one is open. Removing duplicates can be done on some remote libraries, but its usually easier and better to do it on the local machine.
Start with ![]() File Duplicates, by selecting the filter. The first number in parenthesis will be the number of file duplicates SuperSync detected. Continue with the steps below. Once you understand the process, you can carefully proceed to Format Duplicates, and finally "Possible Duplicates".
File Duplicates, by selecting the filter. The first number in parenthesis will be the number of file duplicates SuperSync detected. Continue with the steps below. Once you understand the process, you can carefully proceed to Format Duplicates, and finally "Possible Duplicates".
1. Select the Format Filter you wish to display. (Start with ![]() File Duplicates).
File Duplicates).
The tracks will be displayed in "standard order" and you can view them by album, artist, title, file path, etc. to help you visualize the duplicates.
2. Select one or more tracks that you wish to remove duplicates on and select Remove Duplicates... from the Action menu.
Until you get used to SuperSync's duplicate removal system, you should just select a few tracks at a time to fix. We don't want you to remove the wrong tracks by mistake! Always carefully review the suggestions before continuing. |
3. The tracks will be displayed with suggested duplicates to remove marked with a trash can icon, and tracks to keep will not be marked with for trash.
A Dialog will appear saying what SuperSync did and whether you want to keep the tracks in the trash. Read the notice carefully. You may need to move this dialog around to see the changes. If you want to proceed, click "Keep in Trash", if you want to undo the changes, click the "Undo Changes" button.
4. If you clicked "Keep in Trash" your tracks will be displayed in Duplicate Removal Order, where the track to keep will be first, followed by one or more duplicates recommended for removal.
Carefully review the changes. You can remove all items from the trash by selecting "Remove All from Trash" from the Action menu. You can remove a selection of tracks from the trash by selecting them and choosing "Remove from Trash" from the Action menu.
With tracks in the trash, you can either delete the trash now or add more duplicates to the trash by repeating steps 2-4.
When you are ready, select Empty the Trash from the Action Menu.
Note, if you are using the iCloud/iTunes Match, you may need to manually delete them from iTunes by following the instructions in the SuperSync trash dialog. Typically you'll want to click the iTunes box that says "Also delete tracks from the cloud". This is covered in the cloud help topic.
SuperSync comes with a fully functional music player for any file currently in the local or remote libraries. Files that can be played are displayed in the main library viewer, regardless of their location or whether or not they have been synchronized.
The player toolbar acts as a remote control for all of the music files displayed in the main library viewer. The following describes the different buttons on the player toolbar:

The speaker button launches a slider that controls the output
volume of the player. The slider ranges from zero to 100, though it has
no effect on the overall volume controlled by the system. Pressing +up arrow or selecting Control > Volume Up increases
the volume by an increment of five on the slider scale. Pressing
+down arrow or selecting Control > Volume Down decreases
the volume by an increment of five on the slider scale.
The play button plays the current selected song. If several
songs are selected, the player plays them in order. The player
continues on to the next track in the library if a single song is
selected; the player stops after playing multiple songs that are
specifically selected. Songs can also be played by double-clicking on
the title, by right-clicking and selecting Play, or
selecting Play from the Action or the Control pull-down menus.
If SuperSync can't play your a file, it will be quietly skipped, rather than alerting you with an error dialog. This is a feature.
SuperSync cannot play movies files, m4v files, audio books, encrypted tracks, lossless AAC, files only on the cloud, and some other files. Cloud tracks must be downloaded before they can be played.
You can try re-encoding the track in another format if you like. Any player errors will be logged in the Log Window (O) if the "Player" checkbox is checked.
If a file also does not play in iTunes, it may mean the file is corrupt, missing, or otherwise damaged.
[Return to the SuperSync Table of Contents Section in this manual]
Web Search launches a browser (or iTunes) window displaying additional information about a selected track.
To use the web search feature, select a track in SuperSync and then go to the Search menu and select the one the following searches:
To quickly perform search, use the "Fkey" keyboard shortcuts to quickly go to popular music sites. For example, select a track and then use F1 key to search for more tracks from that artist in iTunes.
The search that is performed depends on the request, but usually involves searching on the artist, album, and or track title.
All searches are subject to site availability, internet access, and other factors. The list of searches available are subject to change in subsequent versions.
[Return to the SuperSync Menu Section in this manual]
SuperSync includes a powerful network server that allows you to connect to your media library on other computers running SuperSync.
To configure the server, you'll need to enable it, and set server name, password, and upload privileges in the Network Settings preference panel.
You can also view the status of the server by showing the "server status" from menu Status->Server. It should show the state of the server, how many tracks and playlists have been published, and how many connections are online.
![]()
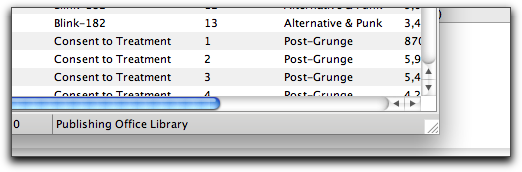
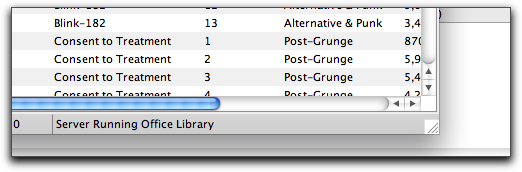
You can always tell at a glance whether the server is running by checking for "Server Running" in the right most field of SuperSync Windows Status Bar.
Connecting to a "Remote" SuperSync is documented in the Configuring the Remote Library section earlier in this manual.
If you are having trouble connecting to your server, check for any personal firewalls that may be installed on your machine. SuperSync will need to connect via TCP to the port that you decide to use (5360 is the default).
If you plan to access your server over the WAN (basically, between two computers that are not in the same home/office) than you should see the next section on WAN setup. From there you can check your IP address and test your connection.
There are also sources on the internet that can help first-time server setup users get familiar with running a server on a home or office network.
[Return to the SuperSync Table of Contents Section in this manual]
WAN (wide area network) access gives you the ability to access your music from "anywhere on the internet". However, getting WAN access to work in all situations requires that you understand some basic and advanced networking concepts.
There are three main ways to get SuperSync to work over the WAN. The easiest method is to try to enable UPnP and test the connection using the What's my IP Address item. If it works, you can skip the theory. If it doesn't work for you and you want to access your library from anywhere, you'll need to delve into the various addressing schemes.
Static IP address. This is the least likely situation, and the riskiest in terms of firewall protection. In this case, your ISP has assigned you a set of "static" IP addresses that are globally unique and used for servers. If you have such an IP address, you should be able to enter the IP address into another SuperSync and access your music. However, if you're like most home/business users, you'll be behind a router acting as a firewall.
UPnP Enabled Router. In this situation, your computer is given an internal address that is only available to other machines connected to the router. Many routers have a feature called Universal Plug 'n Play which lets you easily set up computers on your network for gaming, chatting, or other types of computer-to-computer communication. If you're not sure, assume you are and check the UPnP if you wish to access your server from outside your home or office. When the server is started, traffic for the server is automatically re-directed to your computer.
Only one computer per household can use the default SuperSync port, 5360. If you wish to access multiple machines from outside the firewall, you'll need to put each computer on it's own unique port, such as 5360, 5361, 5362, etc. You can run SuperSync on any port greater than 1024 and less than 10000.
Port-Fowarding : If you do not have a router that supports UPnP, you may be able to configure it to allow port-forwarding. Which means you're manually setting up the router to forward port 5360 (or whichever port you decide) traffic to your computer. This is a little more complicated, and you might want to go to the www.portforward.com site for more information.
[Return to the SuperSync Table of Contents Section in this manual]
SuperSync's server has a web server built in that lets you access your MP3 music from a web browser.
Use the Network Settings tab in the Preferences window to enable web access (enable/check the Enable web browser for MP3 access checkbox). Set a user name and password to protect your media files. In the bottom right of the SuperSync Window, you should see the status message "Server running".
The web browser has two modes - Flash for modern browsers (Firefox, IE, Safari) and iPhone, for iPhone web browsing.
From the same machine that is running SuperSync, select Tools->Open Personal Music Browser.
From another machine, enter the http://hostname:port/ where hostname is the IP address or host name of the SuperSync, and port is the server port you're using (5360 is the default.) Use the Tools->Check My IP Address... from the SuperSync server to determine its IP address.
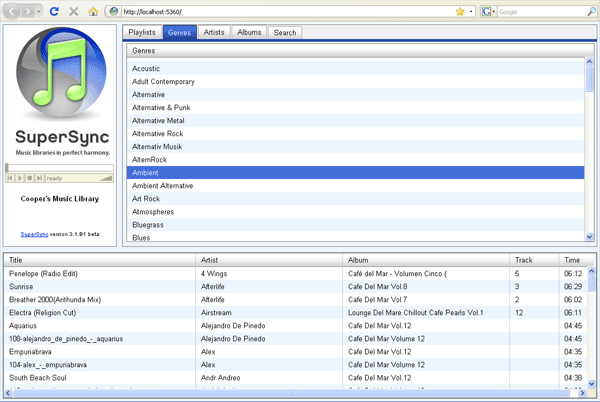
The SuperSync Adobe Flash player only supports MP3 playback.
To access the iPhone/iPod Touch browser, open Safari on your iPhone and enter the IP address:port of your SuperSync server. The port is 5360 by default, but you'll need to determine the IP address of your computer by using the Tools->Check My IP Address...
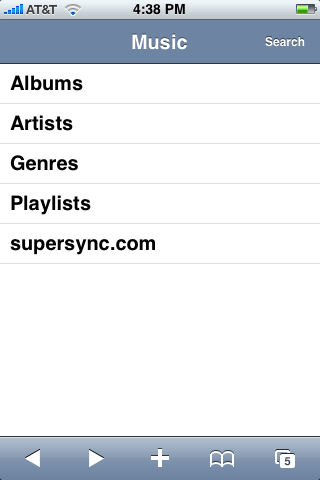 Main SuperSync iPhone Menu |
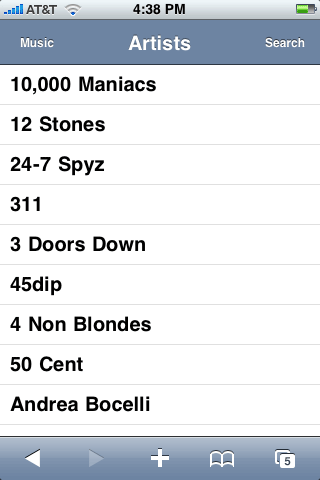 List of Artists |
 Search for artist, album or title. |
 The iPhone track player |
iPhone support uses the Safari browser to let you view your music library and play tracks.
The web access feature in SuperSync has been recently added. We welcome all suggestions for improvement. Accessing your music from a web browser is limited to compatible browsers, available music player technology, and other limitations. Firefox or Safari is recommended for web access.
The HTML directory is available for modification within the application. Modify files at your own risk, make backups before modifying the HTML, please send us any improvements or bug fixes you find.
[Return to the SuperSync Table of Contents Section in this manual]
IP addresses are used to communicate on a network. They can be represented in host name form (apple.com, or supersync.com) or by the IP4 standard of 4 numbers 0..255 separated by dots, (192.168.100.1)
Two types of IP addresses are common -- NAT addresses that are only available from inside a firewall or router. This is the most common for home users. For simplicity, a NAT address starts with 192. or 10.
Use the Tools-> Check my IP address menu to get more information about your IP address and whether it is accessible. Use the "Test Connection" button to determine if your server is accessible over the Internet (WAN Access). The test Connection will go to our server (when available) and see if your library is available online. We don't actually connect or log in - we just do a simple ping that lets us know whether or not you're likely to be able to have others log on to your server from outside of the firewall. The availability of this feature is subject to availability and may become disabled at a future time.
More information about using SuperSync on the Internet (WAN).
[Return to the SuperSync Table of Contents Section in this manual]
This feature was removed due to lack of interest. We have added new support for NAS systems that supercede all of this functionality.
iTunes Match allows you to keep your music backed up and available on different computers. With SuperSync, you can take things further, by consolidating libraries, removing duplicates, accessing your library from more computers, Match more tracks, and upgrade the bitrates of matched tracks. There is a lot to cover, so lets get started.
iTunes Match is a paid subscription service from Apple that helps you keep your music on Apple's iCloud and also "matches" music you already own and makes it available at 256-kbps AAC DRM-free, an excellent sound quality for music lovers.
When we talk about lower or higher bitrate, you can simply substitute the word quality for bitrate... 256-kpbs is better quality than 128 kbps. Search the web for more information about comparing different formats (AAC vs. MP3) and sound qualities.
We typically recommend you create one SuperSync/iTunes Master Library that has a copy of all the tracks you own on one big library. This master library can be added, modified, and accessed by other SuperSync applications you own. Other computers (a laptop, for instance) can have a subset of the library on it, and can add new music to the master.
Deleting Tracks that are on iCloud
Deleting tracks that are on the cloud requires an iTunes dialog that asks whether you want to delete the song from iCloud.
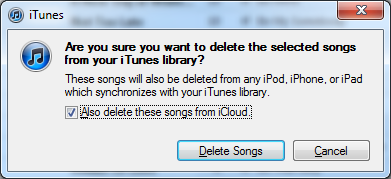
![]() When removing duplicates or songs you no longer want, check the "Also delete these songs from iCloud".
When removing duplicates or songs you no longer want, check the "Also delete these songs from iCloud".
When upgrading tracks to a higher bitrate (described below) the option must be unchecked.
To avoid seeing this dialog for every track you want to delete, SuperSync implements a 2-step process to Empty the Trash. First, tracks are "Unchecked" in iTunes. Next, you the user, will need to select the "unchecked" tracks and select Delete.
From iTunes, sort by "Checked" by clicking the "Check" until it becomes highlighted, as below.
Scroll to the bottom of your music library and the tracks to delete will be "unchecked" at the bottom of the list. Select just the "unchecked tracks" and right-click select "Delete" or press the Delete key. Carefully review the "Also delete these songs from iCloud" and check or uncheck according to what you are doing.
Setup SuperSync for iTunes Match
The first time you select Cloud Overview in the File menu, you will be asked to set up SuperSync for iCloud.
iTunes Match Activities and Status
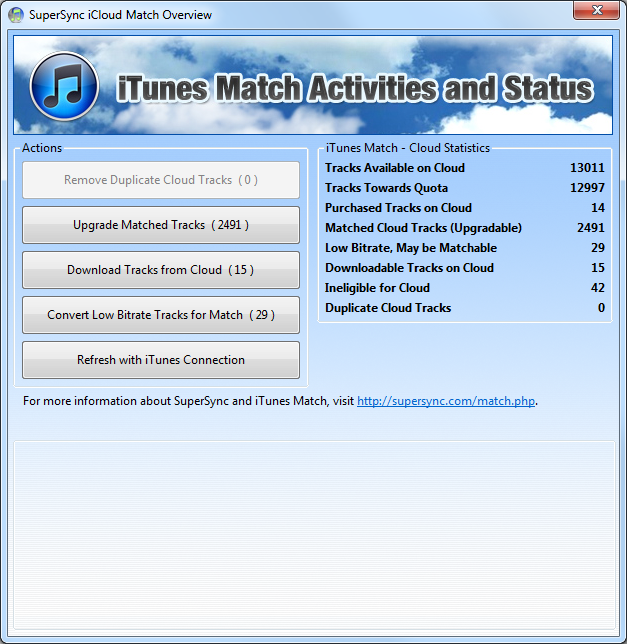
The overview has a number of statistics and action buttons. Please review the Cloud actions available before pressing these buttons.
Remove Duplicate Tracks
iTunes Match may upload two copies of the same song. Click the Remove Duplicate Tracks to select the tracks that can be deleted. These tracks will be added to the trash for your review.
If you are satisfied with the proposed deletions, you can Empty the Trash from SuperSync's Action menu. If you do not wish to delete these files, remove them from the trash before continuing to other steps below.
When asked to confirm the delete, you can check "Also delete these songs from iCloud".
Upgrade Matched Tracks
Matched tracks can be upgraded to a 256-kbps AAC file if you want. The original file (MP3 or AAC) will be replaced with the same song, but from Apple's music service.
![]() This action will change your library. Have a backup and read the instructions carefully.
This action will change your library. Have a backup and read the instructions carefully.
This process involves putting a number of your original tracks into the trash and deleting your local copy. When asked in iTunes, uncheck "Also delete these songs from iCloud".
When you are done, your tracks can be immediately played in iTunes at the new higher bitrate. You playlists should be unaffected. All of these tracks will be available to download in the next step.
Upgrade Low-Bitrate Tracks
iTunes will mark some tracks as ineligible for matching because the bitrate is too low. You may have "ripped" a bunch of CD's at a low-bitrate and want to upgrade them to 256-kbps tracks.
SuperSync can help identify tracks that you may be able to Match and Upgrade.
By upsampling these tracks to a higher bitrate, they can often be Matched and upgraded to a high-quality 256kbps AAC file.
To do this, use SuperSync to identify the tracks and view them in iTunes. These tracks will have have the Ineligible cloud with flag next to them.
![]()
Next, set your iTunes Encoder to AAC 128kbps. Go to iTunes Preferences from the Edit Menu.
In the General Tab, select Import Options... and set the type to AAC and the custom quality to 128kbps. (You can change the settings back to your preferred settings when you're done with this section.)
Select the tracks that are actual recorded music (that might be in Apple's Library) and option-click and select "Create AAC version".. At this point you'll have two copies of the song... Wait a moment, and iTunes should tell you if it is "uploaded" or "Matched". If it is Matched, you'll be able to upgrade the tracks to 256kbps.
You'll also need to remove files that were successfully up-sampled and matched.
Refresh iTunes Connection
This button will reconnect to iTunes and make sure SuperSync is using an up-to-date version of the library. It is rarely needed as the information will be updated within seconds of iTunes updating its information, but it can give you a faster way to force an update after many changes to an iTunes library and will also let you know if there are any problems.
Cloud Information and Statistics
The Cloud Overview window (from the File Menu) also shows you a number of statistics about your library.
For more information about iTunes Match and iCloud, we recommend Lex Friedman's Sams Teach Yourself iTunes Match in 10 Minutes, available on the iTunes store.
Setting up SuperSync for iTunes Match
SuperSync needs a few smart playlists added to your iTunes to really work well with iTunes Match.
These playlists will be added to a new Playlist Folder called "SuperSync Work". We think these playlists will be useful to you as well, but at any time you can delete them from iTunes... and if you want them back again later, you can re-import them.
Select Cloud Overview from the SuperSync's File menu. If you see a big blue dialog, you've already done this step and can continue here.
Otherwise, you'll have an opportunity to configure iTunes for SuperSync Cloud support.
1. When you open the "SuperSync iTunes Match Setup" dialog, a temporary file is created on your desktop called "_supersync.xml".
2. Open iTunes, and from the File Menu, select Library, and the submenu "Import Playlists..."
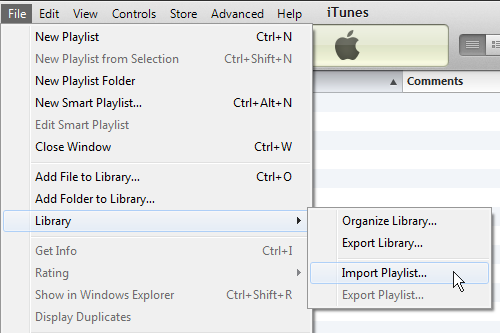
3.Select the "_supersync.xml" file from your desktop. Once imported, you'll see a new folder in iTunes with the following Smart Playlists:
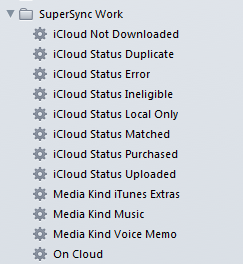
4. You are done... Click on in SuperSync and in a minute you'll have access to the Cloud Overview from the File menu
This window shows detailed information about a track such as file name, file size, file path, its tags (artist name, album name, etc), and its iTunes meta data (if the track is in a Local or Remote library that has been set to use an iTunes library).
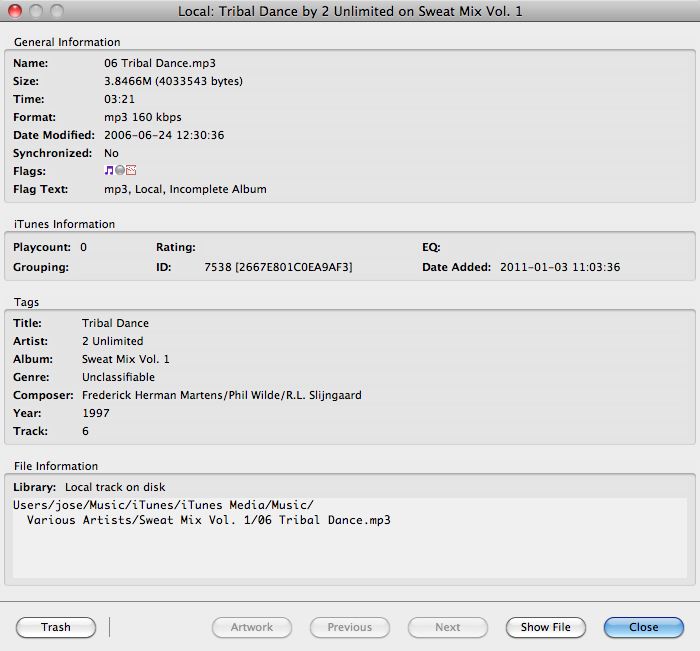
[Return to the SuperSync Menu Section in this manual]
The Duplicate Inspector lets you quickly view and compare duplicate tracks (or tracks that are possibly duplicates).
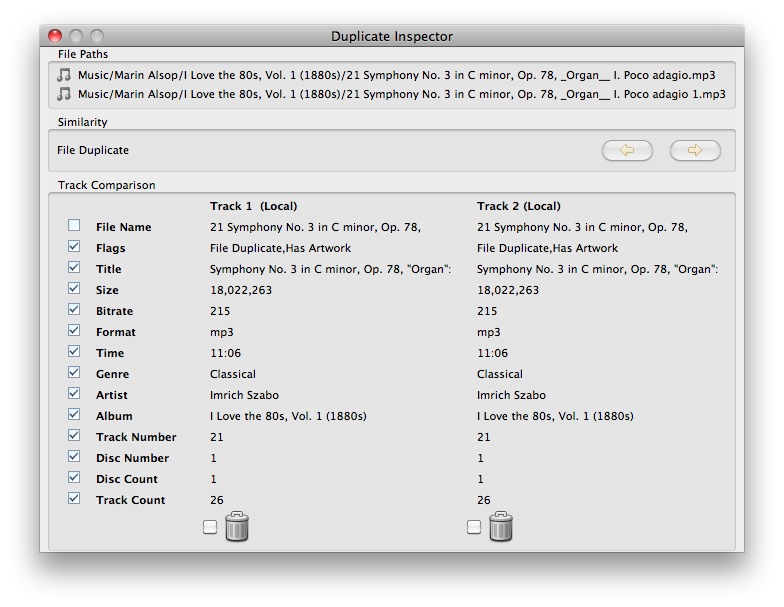
Bring up the Track Compare window by selecting one or two tracks and select "Compare Tracks..." from the action menu or by right-clicking the tracks.
If you select two tracks, those tracks will be compared. If you select a single track, it will compare it with a duplicate track.
If you have any possible duplicate tracks, you can use feature to help decide which track to keep.
The window will show track details such as File Name, CRC, Size, etc are shown side by side so you can easily determine which file to keep. When you decide to delete one of the songs, simply enable/check the Trash icon underneath the song you want to delete. This will put the song in SuperSync's Trash.
For more information about removing duplicates, see Duplicate Removal.
[Return to the SuperSync Menu Section in this manual]
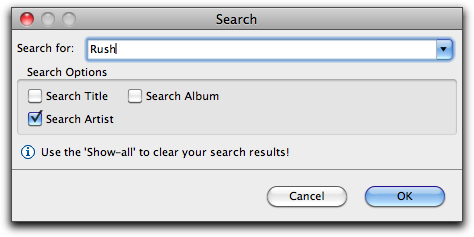
Use the search dialog to find tracks.
Once you enter a search, click OK and the tracks that match will show up in the Song Table.
Use the ![]() Show All button or the Show All command in the SuperSync's Search Menu to reset the search and show all tracks.
Show All button or the Show All command in the SuperSync's Search Menu to reset the search and show all tracks.
Tip: To quickly navigate to a particular table item, simply select the table and type the name of the artist, album or genre.
Example: To quickly navigate to the artist "Rush", click on the artist table, and type "rush".
Show Matching Artist/Album
To Quickly find more tracks by an artist or album, select "Show Matching Artist" or Show Matching Album in the Action menu. (Also available as a contextual menu by option-clicking on a track.)
[Return to the SuperSync Menu Section in this manual]
SuperSync has a trash function for permanently deleting tracks.
To delete a track, first select the track or a group of tracks and then select the 'Put In Trash' command from SuperSync's Action menu. This will put the tracks in SuperSync's trash.
Tip: You may remove files from the trash by selecting the files and choosing "Remove from Trash".
Important! Remember to use care when using this feature. Blue tracks are tracks on the remote system. Gray tracks are your local tracks. Green tracks usually mean local synchronized but changing the Source in the Filter Tree can allow you to view the remote synchronized files. Use care so that you do not delete tracks by mistake!
To view the file path of the files you are deleting, use the "Get Info" command on the track, or enable viewing the File Path in the View Settings.
Once you are certain that the files marked for deleting should be permanently deleted, select Empty Trash command from SuperSync's Action menu. The tracks will then be added to the delete queue for iTunes and server updates.
iTunes Match Users
If you're using iTunes Match, Apple has made some changes to iTunes that makes it harder to delete tracks that are "also on the cloud".
If you're attempting to delete a track that is on the iCloud, SuperSync uses a 2-step process for you to delete it. Local iTunes Tracks will be marked for delete by unchecking them in iTunes. From there, you'll need to sort by "checked" and then delete them in iTunes. Paying special attention to the checkmark that asks if you want to Also delete the files from iCloud. This is covered in more detail in the cloud help.
Carefully read the warning about what you are deleting before confirming the empty trash operation .
You may delete tracks that are on files on local machine or you can delete tracks on a Remote Library if that other computer has the 'Allow remote users to put tracks in trash' and 'Allow remote users to empty trash' preferences enabled (in SuperSync's Preference Window in the Upload tab).
[Return to the SuperSync Menu Section in this manual]
SuperSync has a check/uncheck function that lets you Check or Uncheck tracks in iTunes. Tracks are Checked in iTunes by default. Checked items play, and unchecked items are not played (skipped) in iTunes. Unchecking a track marks it as "disabled" in iTunes.
In SuperSync, a blue flag ![]() icon means the track is "Unchecked" or Disabled in iTunes.
icon means the track is "Unchecked" or Disabled in iTunes.
SuperSync's uses the Unchecked flag to mark tracks for removal when you are using iTunes Match.
To check track(s), select one or more tracks and right click and select check.
To Uncheck track(s), select one or more tracks and right click and select Uncheck.
Checked tracks can be quickly accessed in the SuperSync Window's Filter Tree under the Flags and Filters in the checked view.
[Return to the SuperSync Menu Section in this manual]
SuperSync was designed for iTunes users. To get the most benefit from SuperSync, you want to make sure your SuperSync and iTunes are working well together. If you are having problems with iTunes, check the following:
iTunes users will want to make sure their Local Library is set to an iTunes share. To check this, under the File menu, select Local Library Info...

Kind: The Local Library type should be set to Kind: iTunes. If the kind is set to Disk, you'll need to set your local library to an iTunes share, which you can do after you have iTunes installed and running. Do from the File->Configure Local Library... Check that the library type changed iTunes.
The iTunes information shows which iTunes Music Library.xml file is being used by SuperSync to read your iTunes library. iTunes creates this file when iTunes starts up, and any time you update your library (by adding a track, playing a track, changing a rating, or many other operations.)
Safe to delete: The iTunes XML file can safely be deleted -- it is only written to disk and is never modified by SuperSync or read in by iTunes.
XML Last Modified: Check that the iTunes file was modified recently. In the case above, we haven't used iTunes in almost two days. This is correct for us. However, if your last modified date is very old and you've used iTunes recently, you probably have SuperSync pointing to an out of date iTunes XML file.
If SuperSync is pointing to an out of date iTunes library, you'll need to find the most recent version on your computer for your user account. Use your computers file search to find all files that match Music Library.xml. When you find one, it should have a modification date later than when you last started iTunes. Use the Configure Local Library to point SuperSync to the new XML location.
Read Only: This should be unchecked if you intend to have SuperSync add music to your iTunes library.
At this point, your SuperSync music library should show the contents of your current iTunes library.
Note: Some types of files are not currently written to the iTunes XML Library (ringtones, for one.) So library counts may be a little off, but still OK.
From the Tools menu, select Check iTunes Connection...
This will attempt to start iTunes if it isn't running. Any open dialogs in iTunes will prevent SuperSync from communicating with iTunes.
If you get a success message, you can skip to step #3.
OS-X Users: SuperSync for OS X uses AppleScript to communicate with iTunes. The most common cause of problems for Mac users are old Scripting Additions that break the system command osascript. I'm not sure why this hasn't been fixed by Apple, but its a big pain trying to explain why SuperSync isn't working.
First, check two directories and remove any files you find to the desktop or another safe location:
/Library/Scripting Additions/
~/Library/Scripting Additions/
The first path is the root level Library folder's scripting additions for the whole computer. The second path are for scripting additions just for your user account. There are no scripting additions that ship with the default OS X, so its safe to assume anything in these directories have been added by a 3rd party. Once any files in these two folders have been moved, try the Check iTunes Connection... again. If you have success, you can decide whether you want to contact the Scripting Addition vendor to get an update or just leave them alone. Usually you won't need any of these files however it may be possible that some files are working and some are broken. If you're not using AppleScript, you can safely leave these files out of the Scripting Additions folders and delete the files.
Another problem we've encountered is a response to the check iTunes connection that starts with :
osascript[xxx]: [FC] Operation took 10950ns
This appears when AppleScript debugging has been turned on for your system.
If you want to check if osascript is working on your system, you can make a quick check:
Step 1. Create a text file with the following:
Can you launch ScriptEditor and try running the following script:
-- Begin SuperSync Check SuperSync for Mac--
tell application "iTunes"
with timeout of 30 seconds
set pl to library playlist 1
return (count of tracks of pl) as string
end timeout
end tell
-- End Check SuperSync for Mac--
Save as a plain text file as "/test.applescript"
Then from Terminal.app, enter the following:
osascript /test.applescript
This should return a single line, showing the number of tracks in your library. If not, osascript is not working on your system. You need to fix that before SuperSync will operate correctly.
When done, you can delete the /test.applescript file.
Windows Users: SuperSync uses the COM interface to talk with iTunes. If you get an error communicating with iTunes on a windows machine, we don't have as much useful information to help you. Make sure any dialogs in iTunes are closed. Restarting iTunes, SuperSync, or your computer may help. Reinstalling iTunes may help.
The whole point of SuperSync is to let you move files from one library into your iTunes library automatically. If this part isn't happening, you'll want to know why!
To add a track from a remote library into your local iTunes library, you should have checked steps #1 and #2. Open a remote library, then select a "Blue" track you want to copy and click Synchronize. Check the Transfer Status Window by selecting it from the Controls menu (-T).
If the track is copied successfully, it will then be added to iTunes. The status of iTunes communication is shown on a single line in the transfer status window. (Also, under the iTunes status pane, from the Status -> iTunes menu.)
If the file does not transfer to iTunes, an error will be generated. If the file is successfully added to iTunes, you'll see the "added" statistic increase. If you copy a lot of tracks using SuperSync, these files will be added one at a time and the status of the iTunes copy queue will show.
Note: The iTunes queue may be paused from the File menu.
If you are seeing errors when adding files to iTunes, the best thing to do is try to get an error message to the SuperSync log window. From File menu, select Show Log Window (-O). Some file types may not be supported by iTunes, or your iTunes library may be reporting another type of error. If you want, you can send us an error log and we'll try to help figure out what went wrong.
Playlists should be visible in the Playlist Tree. If you do not see your playlists, go to the menu: Controls -> View Playlists and make sure that menu item is checked.
Local playlists will be gray, remote playlists will be blue, and synchronized playlists are green.
Select a playlist and the tracks that are in your playlist will show up. (Currently, if the same song is in the playlist more than once, it will only be displayed the first time - but you can still copy a playlist completely including duplicates, if you want.)
To synchronize a playlist, you'll need to be connected to another networked SuperSync that is also configured as an iTunes SuperSync library.
Right click on a Gray playlist and first synchronize all the tracks. When all the tracks are synchronized or cannot be synchronized any more (due to errors, duplicates, or other issues...) you'll be able to synchronize the playlist.
Playlists are currently synchronized one at a time. (We're working on a batch synchronize mode)
Smart Playlists cannot be synchronized at this time, due to a limitation of Apple's current programmers interface. If you export/import your smart playlists, there is a way, but its a bit complicated... it involves making a copy of your iTunes Music Library.xml file, opening the copy in a text or xml editing application, then removing all the tracks and "dumb" playlists.. Leaving only the smart playlists you're interested in copying to another machine. Then save the XML file as "smart_playlists.xml", and send it to the new machine where you want to import the smart playlist. Next, back up the iTunes library files, then import the smart_playlists.xml file into the iTunes library using the File: Library: Import feature in iTunes. Do this at your own risk..
If you're still having problems, let us know.. Usually SuperSync can talk to iTunes without a problem. But if there are errors, we'd like to know so we can help improve everyone's experience.
[Return to the Troubleshooting Section in this manual]
[Return to the SuperSync Table of Contents Section in this manual]
SuperSync includes a client and server that lets two copies of SuperSync communicate over a properly configured network.
To connect to another SuperSync server on your LAN, usually you'll simply select Remote Menu -> Connect to LAN server submenu and choose the SuperSync you wish to connect to. To connect to a SuperSync on the Internet (WAN) you'd use the Remote Menu-> Connect to Server... and enter the IP/host address of the server you're connecting to. If you are having problems, here are some things to check.
The SuperSync server can be checked by selecting "Server Status" in the Status menu. The words "Server Running" should be visible. If the server is not running, make sure to enable it from the network preferences.
SuperSync's built-in client/server will cause most firewalls to warn you about a possible security alert. You'll need to allow network traffic for SuperSync. Some computers can have multiple firewalls.
Mac users, the default firewall settings can be changed by Opening Control Panels, selecting the Security Control Panel, then clicking on the Firewall tab. You can manually add SuperSync as an application to allow communication.
Determine the IP addresses of both computers running SuperSync
If you're on a LAN, both machines should be on the same subnet, which usually means both machines should have the first 3 groups of numbers the same on both IP addresses. (example 192.168.0.50 and 192.168.0.55) Manually entering the IP address of the server you want to connect to into the Connect to server.. dialog may help. Use the Tools: Check My IP Address... to determine the IP address(es) of both machines.
If you are attempting to connect to a wireless SuperSync from a wired SuperSync, this can sometimes not be possible. Try making both machines wired or or both wireless. (This issue is related to the issue above - where your machines will be on separate local networks that are separate.)
If you're still having problems, let us know.. Usually SuperSync can talk to other SuperSync computers on the same network without a problem. But if there are errors, we'd like to know so we can help improve everyone's experience. To submit a request for help, use the Tools Menu- Include the IP address of the other machine you are connecting to and what error message you see.
[Return to the Troubleshooting Section in this manual]
[Return to the SuperSync Table of Contents Section in this manual]
When your Local or Remote Libraries are connected to iTunes Libraries, SuperSync sends commands to iTunes so that sync'ed tracks are added to the iTunes database. This allows you to see the newly added track in iTunes. This feature is called iTunes Updates.
After a sync action (e.g. Get, Put, or Sync), SuperSync will issue commands to iTunes. These updates are shown in the Transfer Status window, under iTunes Updates. You can also check the status of iTunes Updates in SuperSync's Status Pane by selecting iTunes Status (+7) from the Status menu.
You can also just look at the number of tracks displayed at the bottom of your iTunes application window. The total song count should increase with each update.
![]()
IMPORTANT: Do not quit SuperSync while it is updating your iTunes library or you will need to rescan your library when you restart SuperSync. You may want to wait until iTunes is no longer updating before starting another update, however this is not required. When updating a large (15,000+ track) local library, adding each individual track to iTunes will take progressively longer for iTunes to process the additions.
[Return to the SuperSync Table of Contents Section in this manual]
SuperSync Server extends the capabilities of SuperSync to the NAS. By storing your music on a Network Attached Storage appliance, users can maintain a library of all their music, video and playlists on a device that is allows 24/7 access to the media.
SuperSync Server is a single click, easy to install, add-on application available in your NAS to simplify the management of your iTunes libraries throughout your network. Seamlessly connect from your Macs, PCs, iOS devices to the SuperSync Server to sync, merge, transfer, compare your iTunes libraries and manage music & videos.
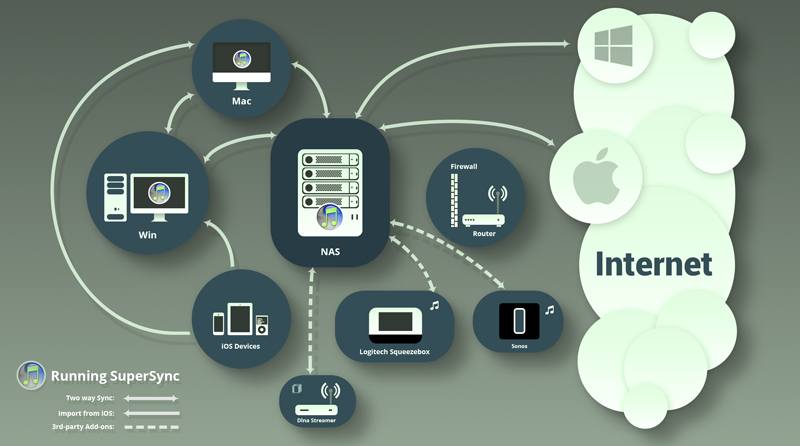
SuperSync Server and SuperSync Desktop communicate smartly and intuitively with each other within your local network to automate and simplify your entire music management within the network.
Connect from the Desktop SuperSync to the NAS SuperSync Server and you can instantly see which tracks are on the NAS, which are on your desktop, and which are in both and "synchronized".
With a few clicks in SuperSync, you can move files and playlists to and from the NAS.
 |
 |
 |
 |
|---|
Install SuperSync on your NAS and connect to it from any Mac or PC running SuperSync.
A valid license is required to use the software. A limited demo is available for evaluation purposes and limited use. Your financial support ensures that we can continue to make improvements and offer new products in the future.
Care should be taken so that you do not allow unauthorized users to download songs that are copyrighted.
The terms of agreement for using this software is that you are responsible for not illegally copying music.
You further agree to hold the developers harmless and defend the developers against any action against you as a result of using this application.
A sincere thank you go to the following who have contributed code and art for this application.
SuperSync was written in Java, C, C++, COM/AppleScript. It uses some stand-alone libraries that are licensed by various means.
The full text of the LGPL license is available online at (http://www.gnu.org/licenses/lgpl.html).
UNDER NO CIRCUMSTANCES AND UNDER NO LEGAL THEORY, TORT, CONTRACT, OR OTHERWISE, SHALL LICENSOR OR ITS SUPPLIER(S) OR RESELLERS BE LIABLE TO YOU OR ANY OTHER PERSON FOR ANY INDIRECT, SPECIAL, INCIDENTAL, OR CONSEQUENTIAL DAMAGES OF ANY CHARACTER INCLUDING, WITHOUT LIMITATION, DAMAGES FOR LOSS OF GOODWILL, WORK STOPPAGE, COMPUTER FAILURE OR MALFUNCTION, OR ANY AND ALL OTHER COMMERCIAL DAMAGES OR LOSSES. IN NO EVENT WILL LICENSOR BE LIABLE FOR ANY DAMAGES IN EXCESS OF THE AMOUNT RECEIVED FROM YOU FOR A LICENSE TO THE SOFTWARE, EVEN IF LICENSOR SHALL HAVE BEEN INFORMED OF THE POSSIBILITY OF SUCH DAMAGES, OR FOR ANY CLAIM BY ANY OTHER PARTY.
We guarantee that the product performs as advertised for a minimum of 30 days. Users may claim a refund with cause for up to 30 days. Due to the nature of the software, changes in 3rd-party applications or operating systems may cause the PROGRAM to stop functioning as intended. In the case where a 3rd-party application or OS stops working with the product, we will attempt to notify our users of the situation, but we cannot guarantee a fix.
iTunes and iPod are trademarks of Apple Computer, Inc. and is in no way affiliated with SuperSync.
Thank you to all who have provided feedback, purchased copies, and helped us promote SuperSync.
Dedicated to Beth & Allison, and the twins...
[Return to the SuperSync Table of Contents Section in this manual]
We value your feedback, bug reports, feature requests, and comments.
You can contact us directly by visiting our website at:
You can also use the Send us a Suggestion or Bug Report command in SuperSync's Tools Menu to open a contact form.
Your feedback is valuable to us in making SuperSync an excellent product. Please do not hesitate to contact us.
[Read the SuperSync Menu Section in this manual]
[Return to the Table of Contents Section in this manual]